<?xml version="1.0" encoding="UTF-8"?>
<feed xmlns="http://www.w3.org/2005/Atom">
    <title>開発の覚書</title>
    <link rel="alternate" type="text/html" href="http://www.brainchild.co.jp/blog/develop/" />
    <link rel="self" type="application/atom+xml" href="http://www.brainchild.co.jp/blog/develop/atom.xml" />
    <id>tag:www.brainchild.co.jp,2010-02-11:/blog/develop//2</id>
    <updated>2013-03-18T13:29:01Z</updated>
    <subtitle>吉祥寺にあるブレインチャイルド社員が、日々の開発で得た技術情報などを公開するブログです。</subtitle>
    <generator uri="http://www.sixapart.com/movabletype/">Movable Type 5.01</generator>

<entry>
    <title>JAVA言語入門勉強会</title>
    <link rel="alternate" type="text/html" href="http://www.brainchild.co.jp/blog/develop/2013/03/post.html" />
    <id>tag:www.brainchild.co.jp,2013:/blog/develop//2.93</id>

    <published>2013-03-18T13:18:27Z</published>
    <updated>2013-03-18T13:29:01Z</updated>

    <summary> 	JAVA言語入門勉強会を行っています。 	下記に過去分の資料を載せておきまし...</summary>
    <author>
        <name>yajiyaji</name>
        <uri>http://www.brainchild.co.jp/</uri>
    </author>
    
        <category term="勉強会" scheme="http://www.sixapart.com/ns/types#category" />
    
    
    <content type="html" xml:lang="ja" xml:base="http://www.brainchild.co.jp/blog/develop/">
        <![CDATA[<p>
	JAVA言語入門勉強会を行っています。<br />
	下記に過去分の資料を載せておきました。</p>
<p>
	<a href="http://www.brainchild.co.jp/blog/develop/2013/03/18/%E7%AC%AC%EF%BC%91%E5%9B%9EJava%E8%A8%80%E8%AA%9E%E5%85%A5%E9%96%80%E5%8B%89%E5%BC%B7%E4%BC%9A.pdf">第１回Java言語入門勉強会.pdf<br />
	</a></p>
<p>
	<a href="http://www.brainchild.co.jp/blog/develop/2013/03/18/%E7%AC%AC%EF%BC%92%E5%9B%9EJava%E8%A8%80%E8%AA%9E%E5%85%A5%E9%96%80%E5%8B%89%E5%BC%B7%E4%BC%9A.pdf">第２回Java言語入門勉強会.pdf<br />
	</a></p>
<p>
	<a href="http://www.brainchild.co.jp/blog/develop/2013/03/18/%E7%AC%AC%EF%BC%93%E5%9B%9EJava%E8%A8%80%E8%AA%9E%E5%85%A5%E9%96%80%E5%8B%89%E5%BC%B7%E4%BC%9A.pdf">第３回Java言語入門勉強会.pdf</a></p>
<p>
	詳細は「<a href="http://kokucheese.com/main/host/%E3%83%96%E3%83%AC%E3%82%A4%E3%83%B3%E3%83%81%E3%83%A3%E3%82%A4%E3%83%AB%E3%83%89%E6%A0%AA%E5%BC%8F%E4%BC%9A%E7%A4%BE/">こくちーず</a>」のページを参照ください。</p>
]]>
        
    </content>
</entry>

<entry>
    <title>[Eclipse] 古いバージョンのダウンロード</title>
    <link rel="alternate" type="text/html" href="http://www.brainchild.co.jp/blog/develop/2011/06/old-eclipse.html" />
    <id>tag:www.brainchild.co.jp,2011:/blog/develop//2.91</id>

    <published>2011-06-26T09:13:06Z</published>
    <updated>2011-06-26T14:03:49Z</updated>

    <summary> 	気付いたらEclipse 3.7 Indigo がリリースされてましたね。 ...</summary>
    <author>
        <name>yajiyaji</name>
        <uri>http://www.brainchild.co.jp/</uri>
    </author>
    
        <category term="eclipse" scheme="http://www.sixapart.com/ns/types#category" />
    
    
    <content type="html" xml:lang="ja" xml:base="http://www.brainchild.co.jp/blog/develop/">
        <![CDATA[<h5>
	気付いたらEclipse 3.7 Indigo がリリースされてましたね。</h5>
<p>
	ほぼ1年サイクルで新バージョンがリリースされているので、開発に使用しているEclipseはあっという間に古くなってしまいます。</p>
<p>
	さて、一般的にEclipseをダウンロードしようとしたときは下記のオフィシャルサイトにアクセスしている方がほとんどかと思います。</p>
<p>
	<a href="http://www.eclipse.org/" target="_blank">http://www.eclipse.org/ （英語）<br />
	</a></p>
<p>
	上記サイトでは、最新版のダウンロードは比較的目立つのですんなりとダウンロードできます。<br />
	しかし、以前の開発で、私がかなり古いバージョンのEclipseが必要になったときに、<span style="color:#f00;">リンクが非常にわかり辛い</span>ためダウンロードまで苦労した経験がありました。</p>
<p>
	そこで、今更ですが（最新版のIndigoもリリースされたということで）Eclipseの古いバージョンをダウンロードする方法について、ご紹介します。</p>
<p>
	&nbsp;</p>
<h4>
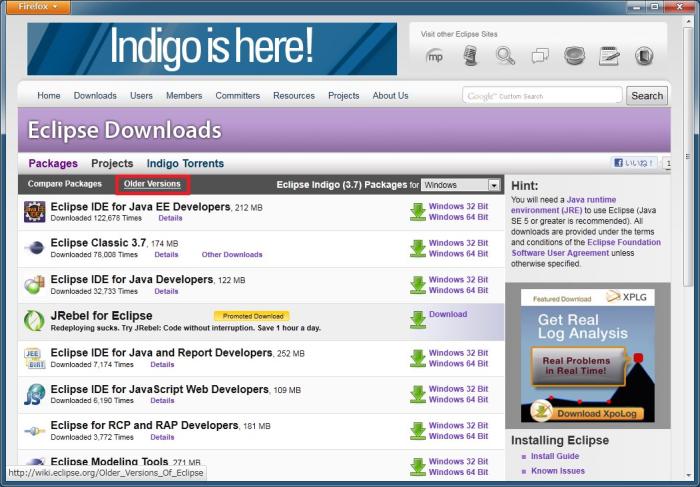
	１．「Eclipse Downloads」画面で、「Older Versions」をクリックします。</h4>
<p>
	　　このリンクがわかり辛いので苦労しました。<br />
	<a href="http://www.brainchild.co.jp/blog/develop/assets_c/2011/06/old_eclips1-592.html" onclick="window.open('http://www.brainchild.co.jp/blog/develop/assets_c/2011/06/old_eclips1-592.html','popup','width=1049,height=731,scrollbars=no,resizable=no,toolbar=no,directories=no,location=no,menubar=no,status=no,left=0,top=0'); return false"><img alt="old_eclips1.jpg" class="mt-image-none" height="487" src="http://www.brainchild.co.jp/blog/develop/assets_c/2011/06/old_eclips1-thumb-700x487-592.jpg" style="" width="700" /></a><a href="http://www.brainchild.co.jp/blog/develop/assets_c/2011/06/old_eclips1-574.html" onclick="window.open('http://www.brainchild.co.jp/blog/develop/assets_c/2011/06/old_eclips1-574.html','popup','width=1006,height=707,scrollbars=no,resizable=no,toolbar=no,directories=no,location=no,menubar=no,status=no,left=0,top=0'); return false"><br />
	</a></p>
<p>
	&nbsp;</p>
<h4>
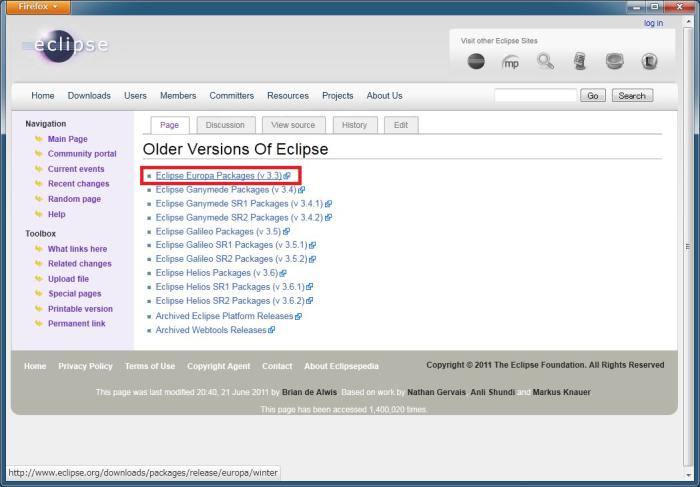
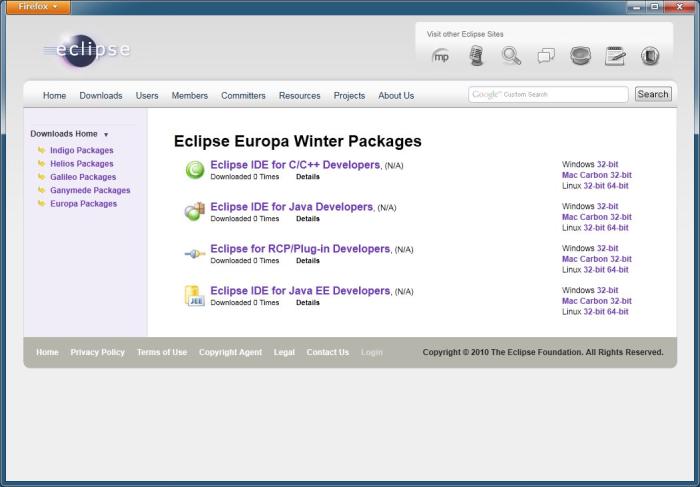
	２．比較的新しいバージョンの場合はこの時点で選択できるので任意のバージョンをクリックしてダウンロードします。</h4>
<p>
	<a href="http://www.brainchild.co.jp/blog/develop/assets_c/2011/06/old_eclips2-595.html" onclick="window.open('http://www.brainchild.co.jp/blog/develop/assets_c/2011/06/old_eclips2-595.html','popup','width=1049,height=731,scrollbars=no,resizable=no,toolbar=no,directories=no,location=no,menubar=no,status=no,left=0,top=0'); return false"><img alt="old_eclips2.jpg" class="mt-image-none" height="487" src="http://www.brainchild.co.jp/blog/develop/assets_c/2011/06/old_eclips2-thumb-700x487-595.jpg" style="" width="700" /></a></p>
<p>
	<a href="http://www.brainchild.co.jp/blog/develop/assets_c/2011/06/old_eclips3-598.html" onclick="window.open('http://www.brainchild.co.jp/blog/develop/assets_c/2011/06/old_eclips3-598.html','popup','width=1049,height=731,scrollbars=no,resizable=no,toolbar=no,directories=no,location=no,menubar=no,status=no,left=0,top=0'); return false"><img alt="old_eclips3.jpg" class="mt-image-none" height="487" src="http://www.brainchild.co.jp/blog/develop/assets_c/2011/06/old_eclips3-thumb-700x487-598.jpg" style="" width="700" /></a></p>
<p>
	&nbsp;</p>
<h4>
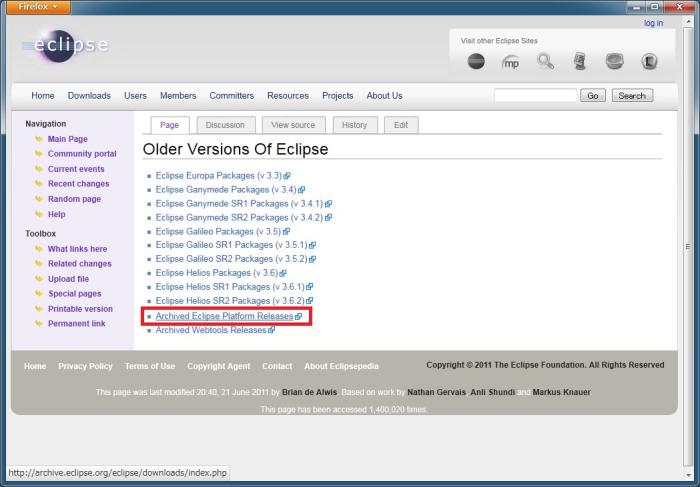
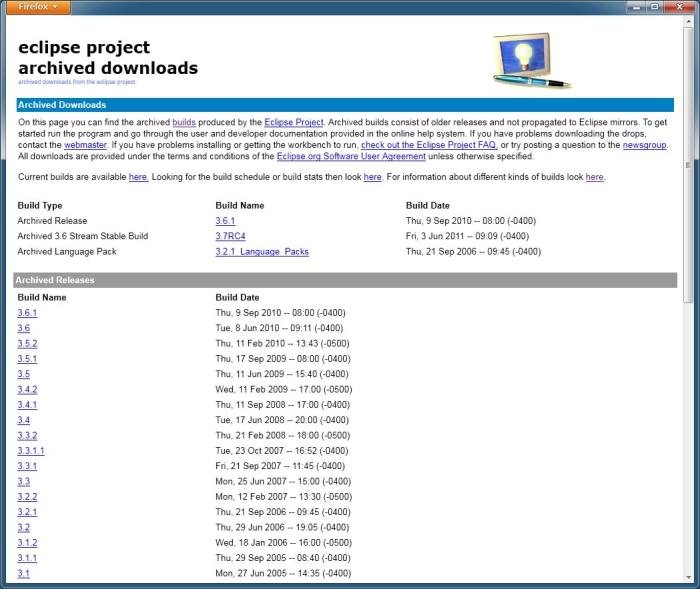
	３．古いバージョンの場合は、「Archived Eclipse Platform Releases」をクリックします。</h4>
<p>
	　※表示順は新しいバージョンがリリースされると変わる場合があるようですが、その場合でも「Archived Eclipse Platform Releases」をクリックします。 <a href="http://www.brainchild.co.jp/blog/develop/assets_c/2011/06/old_eclips4-601.html" onclick="window.open('http://www.brainchild.co.jp/blog/develop/assets_c/2011/06/old_eclips4-601.html','popup','width=1049,height=731,scrollbars=no,resizable=no,toolbar=no,directories=no,location=no,menubar=no,status=no,left=0,top=0'); return false"><img alt="old_eclips4.jpg" class="mt-image-none" height="487" src="http://www.brainchild.co.jp/blog/develop/assets_c/2011/06/old_eclips4-thumb-700x487-601.jpg" style="" width="700" /></a></p>
<p>
	<a href="http://www.brainchild.co.jp/blog/develop/assets_c/2011/06/old_eclips5-604.html" onclick="window.open('http://www.brainchild.co.jp/blog/develop/assets_c/2011/06/old_eclips5-604.html','popup','width=1049,height=884,scrollbars=no,resizable=no,toolbar=no,directories=no,location=no,menubar=no,status=no,left=0,top=0'); return false"><img alt="old_eclips5.jpg" class="mt-image-none" height="589" src="http://www.brainchild.co.jp/blog/develop/assets_c/2011/06/old_eclips5-thumb-700x589-604.jpg" style="" width="700" /></a></p>
<p>
	&nbsp;</p>
<h4>
	【補足】</h4>
<p>
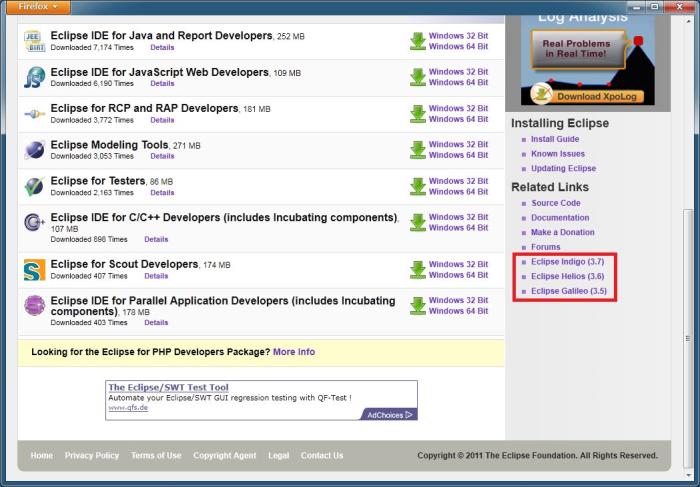
	比較的新しいバージョンであれば、１の「Eclipse Downloads」画面右下にもリンクがありますので、そちらからダウンロードが可能です。 <a href="http://www.brainchild.co.jp/blog/develop/assets_c/2011/06/old_eclips6-607.html" onclick="window.open('http://www.brainchild.co.jp/blog/develop/assets_c/2011/06/old_eclips6-607.html','popup','width=1049,height=731,scrollbars=no,resizable=no,toolbar=no,directories=no,location=no,menubar=no,status=no,left=0,top=0'); return false"><img alt="old_eclips6.jpg" class="mt-image-none" height="487" src="http://www.brainchild.co.jp/blog/develop/assets_c/2011/06/old_eclips6-thumb-700x487-607.jpg" style="" width="700" /></a></p>
<p>
	※Helios（3.6）のダウンロードはなぜかIndigo（3.7）のダウンロードページに行ってしまいました（2011/06/26現在）</p>
]]>
        
    </content>
</entry>

<entry>
    <title>[AdobeAir]WindowedApplicationに読み込んだhtml内のJavaScriptを実行する</title>
    <link rel="alternate" type="text/html" href="http://www.brainchild.co.jp/blog/develop/2011/06/AdobeAirJavaScript.html" />
    <id>tag:www.brainchild.co.jp,2011:/blog/develop//2.90</id>

    <published>2011-06-22T15:49:48Z</published>
    <updated>2011-06-22T17:11:26Z</updated>

    <summary> 	AirアプリにロードしたhtmlのJavaScriptを実行する 	Adob...</summary>
    <author>
        <name>j.imaizumi</name>
        <uri>http://www.brainchild.co.jp/</uri>
    </author>
    
        <category term="AdobeAir" scheme="http://www.sixapart.com/ns/types#category" />
    
        <category term="Flex" scheme="http://www.sixapart.com/ns/types#category" />
    
    
    <content type="html" xml:lang="ja" xml:base="http://www.brainchild.co.jp/blog/develop/">
        <![CDATA[<h3>
	AirアプリにロードしたhtmlのJavaScriptを実行する</h3>
<p>
	AdobeAirで作成したアプリケーション上にロードしたhtml内のJavaScriptを<br />
	Air側から実行する方法が分からず、割とハマったので早速覚書です。</p>
<p>
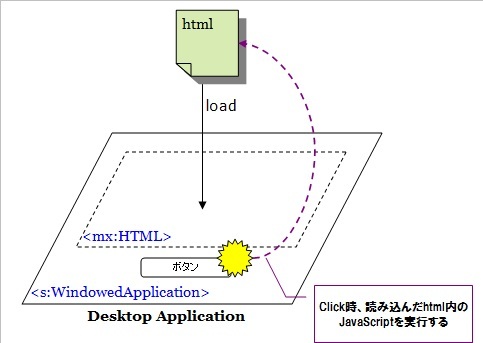
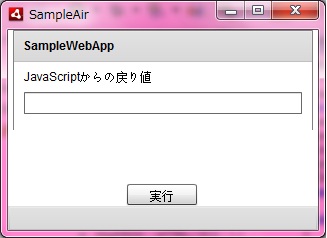
	今回作成したサンプルは、外部のhtmlを読み込みアプリケーション内のボタンをクリックすると<br />
	ロードしたhtml内のJavaScriptのコードが実行されるAirアプリケーションです</p>
<p>
	<img alt="J-110622-1.jpg" class="mt-image-none" height="343" src="http://www.brainchild.co.jp/blog/develop/2011/06/23/J-110622-1.jpg" style="" width="483" /></p>
<p>
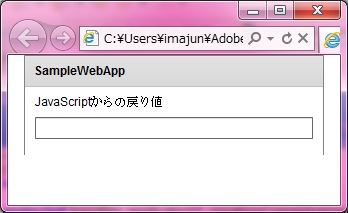
	<strong>&lt;Airアプリ内にロードしたhtml(flexアプリ)&gt;</strong><br />
	<img alt="J-110622-2.jpg" class="mt-image-none" height="213" src="http://www.brainchild.co.jp/blog/develop/2011/06/23/J-110622-2.jpg" style="cursor: default; " width="348" /><br />
	html側で&quot;<span class="Apple-style-span" style="font-family: 'Courier New', Courier, monospace; line-height: 14px; white-space: pre; color: rgb(0, 0, 0); ">callbackFlexFunc()&quot;というメソッドを定義しており、<br />
	実行されるとFlexアプリケーションに 値をコールバックします。</span></p>
<p>
	<span style="color:#0000cd;"><strong>&lt;sampleFlex.mxml&gt;</strong></span></p>
<pre class="brush:js;">&lt;?xml version=&quot;1.0&quot; encoding=&quot;utf-8&quot;?&gt;
&lt;s:Application xmlns:fx=&quot;http://ns.adobe.com/mxml/2009&quot; 
			   xmlns:s=&quot;library://ns.adobe.com/flex/spark&quot; 
			   xmlns:mx=&quot;library://ns.adobe.com/flex/mx&quot; width=&quot;300&quot; height=&quot;100&quot;
			   creationComplete=&quot;application1_creationCompleteHandler(event)&quot;&gt;
	&lt;fx:Script&gt;
		&lt;![CDATA[
			import mx.events.FlexEvent;

			protected function application1_creationCompleteHandler(event:FlexEvent):void
			{
				ExternalInterface.addCallback(&quot;callBackFunc&quot;,
					function(args:String):void
					{
						txi.text = args;
					});
			}

		]]&gt;
	&lt;/fx:Script&gt;
	
	&lt;fx:Declarations&gt;
		&lt;!-- 非ビジュアルエレメント (サービス、値オブジェクトなど) をここに配置 --&gt;
	&lt;/fx:Declarations&gt;
	
	
	&lt;s:Panel x=&quot;0&quot; y=&quot;0&quot; width=&quot;100%&quot; height=&quot;100%&quot; title=&quot;SampleWebApp&quot;&gt;
		&lt;s:Label x=&quot;10&quot; y=&quot;10&quot; text=&quot;JavaScriptからの戻り値&quot;/&gt;
		&lt;s:TextInput id=&quot;txi&quot; editable=&quot;false&quot; x=&quot;10&quot; y=&quot;30&quot; width=&quot;278&quot; /&gt;
	&lt;/s:Panel&gt;
&lt;/s:Application&gt;


</pre>
<p>
	&lt;JavaScript　※index.template.html&gt;</p>
<pre class="brush:js;">function getHtmlString()
{
  ${application}.callBackFunc(swfVersionStr);
}
</pre>
<div>
	&nbsp;</div>
<p>
	<strong>&lt;Airアプリケーション&gt;</strong></p>
<p>
	<img alt="J-110622-3.jpg" class="mt-image-none" height="238" src="http://www.brainchild.co.jp/blog/develop/2011/06/23/J-110622-3.jpg" style="" width="327" /></p>
<p>
	<span style="color:#0000cd;"><strong>&lt;SampleAir.mxml&gt;</strong></span></p>
<pre class="brush:js;">&lt;!--?xml version=&quot;1.0&quot; encoding=&quot;utf-8&quot;?--&gt;
&lt;s:WindowedApplication xmlns:fx=&quot;http://ns.adobe.com/mxml/2009&quot; 
					   xmlns:s=&quot;library://ns.adobe.com/flex/spark&quot; 
					   xmlns:mx=&quot;library://ns.adobe.com/flex/mx&quot; width=&quot;310&quot; height=&quot;200&quot;&gt;

	&lt;fx:Script&gt;
		&lt;![CDATA[
			protected function executeBtn_clickHandler(event:MouseEvent):void
			{
				// ロードしたhtmlのJavaScriptを実行する
				myHtml.domWindow.callbackFlexFunc();
			}
		]]&gt;
	&lt;/fx:Script&gt;
	
	&lt;fx:Declarations&gt;
		&lt;!-- 非ビジュアルエレメント (サービス、値オブジェクトなど) をここに配置 --&gt;
	&lt;/fx:Declarations&gt;
	
	&lt;mx:HTML id=&quot;myHtml&quot; width=&quot;100%&quot; height=&quot;150&quot; 
			 location=&quot;htmlのパス&quot;/&gt;
	&lt;s:Button id=&quot;executeBtn&quot; x=&quot;119&quot; y=&quot;154&quot; label=&quot;実行&quot; click=&quot;executeBtn_clickHandler(event)&quot;/&gt;
	
&lt;/s:WindowedApplication&gt;
</pre>
<h4>
	&lt;mx:HTML&gt;の&quot;domWindow&quot;プロパティにアクセスする事で、<br />
	ロードしたhtml内に定義されるJavaScriptにアクセスする事が可能となります。</h4>
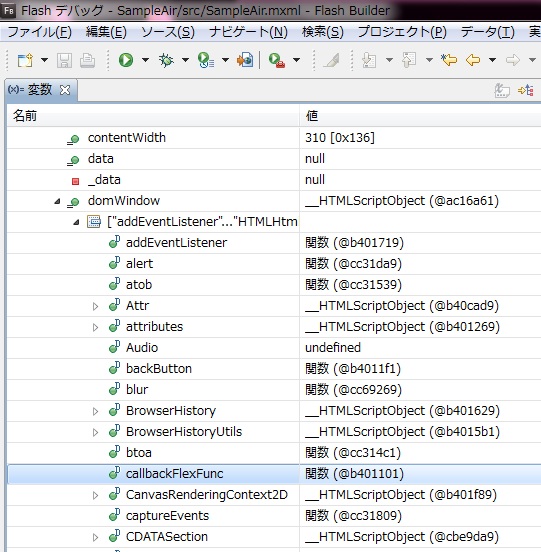
<p>
	変数ビューで確認すると、&quot;callbackFlexFunc&quot;が定義されている事が分かります。</p>
<p>
	<img alt="J-110622-5.jpg" class="mt-image-none" height="552" src="http://www.brainchild.co.jp/blog/develop/2011/06/23/J-110622-5.jpg" style="" width="541" /></p>
<p>
	JavaScriptへのアクセスというと&quot;ExternalInterface&quot;がおなじみですが、 どうやらAirでは対応していないようです。<br />
	ExternalInterface非対応という事で、JavaScriptへのアクセスを諦めようかと思いましたが、こんなに素晴らしい事が出来るとは思いませんでした。<br />
	いえ、、勉強不足ですね。精進しようと思います。</p>
]]>

        <![CDATA[<script id="cke_actscrpt" type="text/javascript">window.onload = function(){window.parent.CKEDITOR._["contentDomReadyeditor-content-textarea"]( window );}</script>]]>
    </content>
</entry>

<entry>
    <title>eclipse(Helios) + Redmine + Subversion の開発環境構築手順 その１</title>
    <link rel="alternate" type="text/html" href="http://www.brainchild.co.jp/blog/develop/2011/01/helios-red-svn1.html" />
    <id>tag:www.brainchild.co.jp,2011:/blog/develop//2.87</id>

    <published>2011-01-30T06:08:07Z</published>
    <updated>2011-04-24T06:59:57Z</updated>

    <summary> 	eclipse（Helios）にSubversiveプラグインをインストール...</summary>
    <author>
        <name>yajiyaji</name>
        <uri>http://www.brainchild.co.jp/</uri>
    </author>
    
        <category term="Redmine" scheme="http://www.sixapart.com/ns/types#category" />
    
        <category term="eclipse" scheme="http://www.sixapart.com/ns/types#category" />
    
        <category term="開発環境構築" scheme="http://www.sixapart.com/ns/types#category" />
    
    
    <content type="html" xml:lang="ja" xml:base="http://www.brainchild.co.jp/blog/develop/">
        <![CDATA[<h3>
	eclipse（Helios）にSubversiveプラグインをインストールする</h3>
<p>
	昨年に、<a href="http://www.brainchild.co.jp/blog/develop/2010/03/flex-builder-3-redmine-subversion.html" target="_blank">Flex Builder 3 + Redmine + Subversion の開発環境構築手順 その１</a>、<a href="http://www.brainchild.co.jp/blog/develop/2010/03/flex-builder-3-redmine-subversion-2.html" target="_blank">Flex Builder 3 + Redmine + Subversion の開発環境構築手順 その２</a>、<a href="http://www.brainchild.co.jp/blog/develop/2010/04/flex-builder-3-redmine-subversion-3.html" target="_blank">Flex Builder 3 + Redmine + Subversion の開発環境構築手順 その１</a>という記事を書いたのですが、Flash4もリリースされ、さすがにFlex Builder 3は古くなってきたな～と実感しています。<br />
	本来ならばFlash4 Builder でRedmineの開発環境構築手順をまとめたいところなのですが、結局ベースはeclipseということで、eclipseの最新バージョン（2011年1月現在）であるHeliosにてRedmine + Subversion の開発環境構築手順をやってみました。<br />
	以下、そのときの手順を紹介しますが、1回の記事にするには長いため、Flex Builder 3のときと同じように3回に分けたいと思います。</p>
<p>
	まずは、その１として、eclipse（Helios）にSubversiveプラグインをインストールしてみました。</p>
<p>
	<br />
	<strong>【前提条件】<br />
	・Redmine、Subversionはインストール、設定済みとします。</strong></p>
<p>
	<strong>【環境】<br />
	<strong>・Windows 7 Ultimate 64bit<br />
	</strong> <strong>・eclipse（Helios） 64bit<br />
	</strong></strong></p>
<h4>
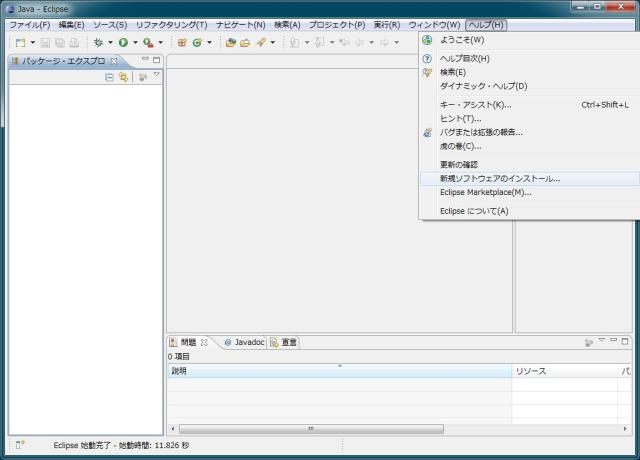
	１．メニューバーの 「ヘルプ &gt; 新規ソフトウェアのインストール...」 をクリックします。<a href="http://www.brainchild.co.jp/blog/develop/assets_c/2011/01/eclipse_Redmine01-529.html" onclick="window.open('http://www.brainchild.co.jp/blog/develop/assets_c/2011/01/eclipse_Redmine01-529.html','popup','width=1022,height=736,scrollbars=no,resizable=no,toolbar=no,directories=no,location=no,menubar=no,status=no,left=0,top=0'); return false"><img alt="eclipse_Redmine01.jpg" class="mt-image-none" height="460" src="http://www.brainchild.co.jp/blog/develop/assets_c/2011/01/eclipse_Redmine01-thumb-640x460-529.jpg" style="" width="640" /></a></h4>
<p>
	インストール画面が表示されます。</p>
<h4>
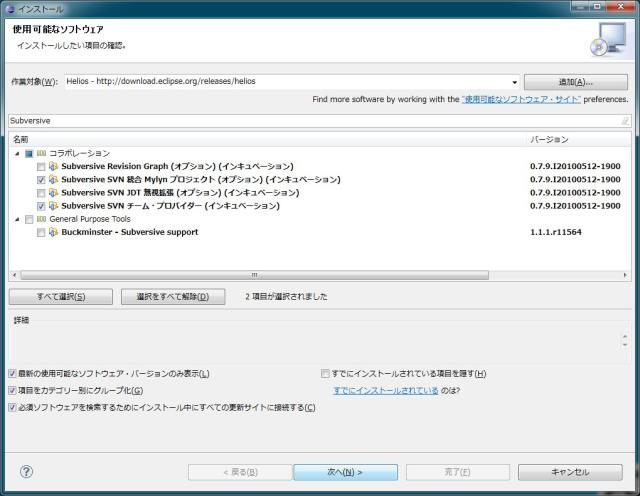
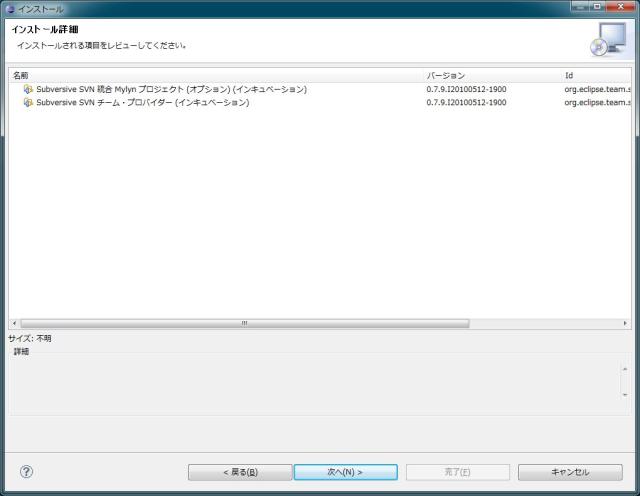
	２．作業対象「Helios - http://download.eclipse.org/releases/helios」を選択し、下記のインストールするソフトウェアを選択し［次へ］ボタンをクリックします。</h4>
<ul>
	<li>
		Subversive SVN 統合 Mylyn プロジェクト</li>
	<li>
		Subversive SVN チーム・プロバイダー</li>
</ul>
<p>
	<a href="http://www.brainchild.co.jp/blog/develop/assets_c/2011/01/eclipse_Redmine02-532.html" onclick="window.open('http://www.brainchild.co.jp/blog/develop/assets_c/2011/01/eclipse_Redmine02-532.html','popup','width=1020,height=792,scrollbars=no,resizable=no,toolbar=no,directories=no,location=no,menubar=no,status=no,left=0,top=0'); return false"><img alt="eclipse_Redmine02.jpg" class="mt-image-none" height="496" src="http://www.brainchild.co.jp/blog/develop/assets_c/2011/01/eclipse_Redmine02-thumb-640x496-532.jpg" style="" width="640" /></a></p>
<p>
	<span style="color: rgb(255, 0, 0);">※この画面では、フィルターを「Suvbersive」で表示を絞り込んでいます。</span></p>
<h4>
	３．次へボタンをクリックします。<a href="http://www.brainchild.co.jp/blog/develop/assets_c/2011/01/eclipse_Redmine03-535.html" onclick="window.open('http://www.brainchild.co.jp/blog/develop/assets_c/2011/01/eclipse_Redmine03-535.html','popup','width=1020,height=792,scrollbars=no,resizable=no,toolbar=no,directories=no,location=no,menubar=no,status=no,left=0,top=0'); return false"><img alt="eclipse_Redmine03.jpg" class="mt-image-none" height="496" src="http://www.brainchild.co.jp/blog/develop/assets_c/2011/01/eclipse_Redmine03-thumb-640x496-535.jpg" style="" width="640" /></a></h4>
<h4>
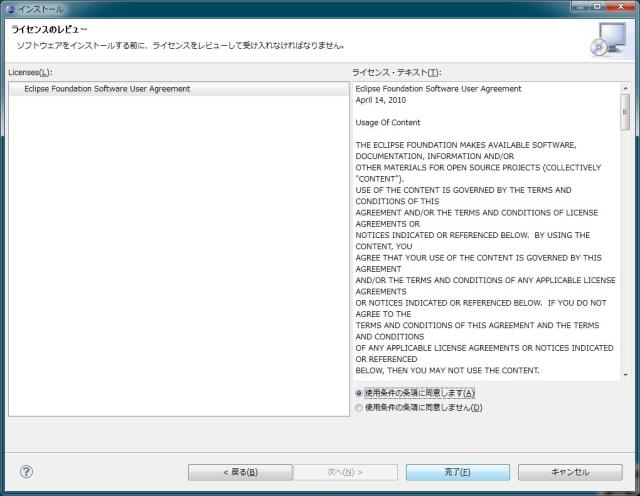
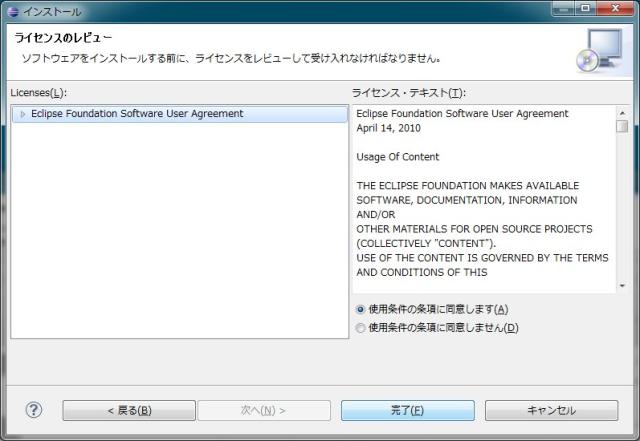
	４．「使用条件の条項に同意します(A)」を選択し、完了ボタンをクリックします。<a href="http://www.brainchild.co.jp/blog/develop/assets_c/2011/01/eclipse_Redmine04-538.html" onclick="window.open('http://www.brainchild.co.jp/blog/develop/assets_c/2011/01/eclipse_Redmine04-538.html','popup','width=1020,height=792,scrollbars=no,resizable=no,toolbar=no,directories=no,location=no,menubar=no,status=no,left=0,top=0'); return false"><img alt="eclipse_Redmine04.jpg" class="mt-image-none" height="496" src="http://www.brainchild.co.jp/blog/develop/assets_c/2011/01/eclipse_Redmine04-thumb-640x496-538.jpg" style="" width="640" /></a></h4>
<p>
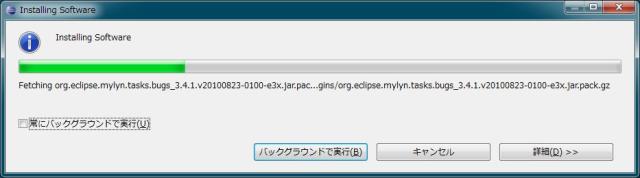
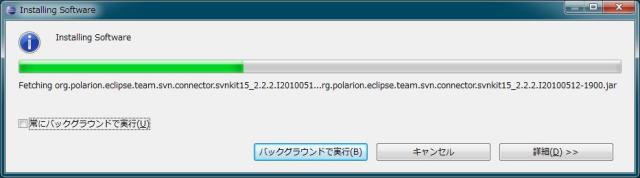
	インストールが開始されますので、しばらく待ちます。</p>
<p>
	<img alt="eclipse_Redmine05.jpg" class="mt-image-none" height="178" src="http://www.brainchild.co.jp/blog/develop/assets_c/2011/01/eclipse_Redmine05-thumb-640x178-541.jpg" style="" width="640" /></p>
<h4>
	５．Restart Nowボタンをクリックし、eclipseを再起動します。<img alt="eclipse_Redmine06.jpg" class="mt-image-none" height="116" src="http://www.brainchild.co.jp/blog/develop/assets_c/2011/01/eclipse_Redmine06-thumb-640x116-543.jpg" style="" width="640" /></h4>
<p>
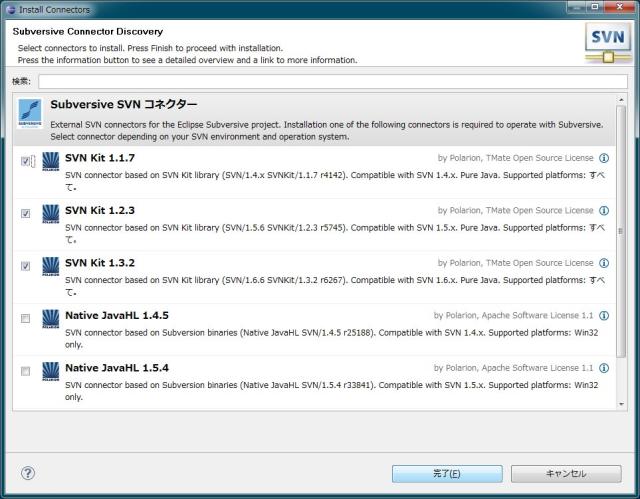
	再起動時に、SVN Install Conectors 画面が表示されます。</p>
<h4>
	<strong>６．「SVN Kit」を選択し、完了ボタンをクリックします。</strong><a href="http://www.brainchild.co.jp/blog/develop/assets_c/2011/01/eclipse_Redmine07-545.html" onclick="window.open('http://www.brainchild.co.jp/blog/develop/assets_c/2011/01/eclipse_Redmine07-545.html','popup','width=963,height=751,scrollbars=no,resizable=no,toolbar=no,directories=no,location=no,menubar=no,status=no,left=0,top=0'); return false"><img alt="eclipse_Redmine07.jpg" class="mt-image-none" height="499" src="http://www.brainchild.co.jp/blog/develop/assets_c/2011/01/eclipse_Redmine07-thumb-640x499-545.jpg" style="" width="640" /></a></h4>
<p>
	暫く待ちます。</p>
<p>
	<a href="http://www.brainchild.co.jp/blog/develop/assets_c/2011/01/eclipse_Redmine08-548.html" onclick="window.open('http://www.brainchild.co.jp/blog/develop/assets_c/2011/01/eclipse_Redmine08-548.html','popup','width=963,height=751,scrollbars=no,resizable=no,toolbar=no,directories=no,location=no,menubar=no,status=no,left=0,top=0'); return false"><img alt="eclipse_Redmine08.jpg" class="mt-image-none" height="499" src="http://www.brainchild.co.jp/blog/develop/assets_c/2011/01/eclipse_Redmine08-thumb-640x499-548.jpg" style="" width="640" /></a></p>
<h4>
	７．次へボタンをクリックします。<a href="http://www.brainchild.co.jp/blog/develop/assets_c/2011/01/eclipse_Redmine09-551.html" onclick="window.open('http://www.brainchild.co.jp/blog/develop/assets_c/2011/01/eclipse_Redmine09-551.html','popup','width=797,height=550,scrollbars=no,resizable=no,toolbar=no,directories=no,location=no,menubar=no,status=no,left=0,top=0'); return false"><img alt="eclipse_Redmine09.jpg" class="mt-image-none" height="441" src="http://www.brainchild.co.jp/blog/develop/assets_c/2011/01/eclipse_Redmine09-thumb-640x441-551.jpg" style="" width="640" /></a></h4>
<p>
	暫く待ちます。</p>
<p>
	<a href="http://www.brainchild.co.jp/blog/develop/assets_c/2011/01/eclipse_Redmine10-554.html" onclick="window.open('http://www.brainchild.co.jp/blog/develop/assets_c/2011/01/eclipse_Redmine10-554.html','popup','width=797,height=550,scrollbars=no,resizable=no,toolbar=no,directories=no,location=no,menubar=no,status=no,left=0,top=0'); return false"><img alt="eclipse_Redmine10.jpg" class="mt-image-none" height="441" src="http://www.brainchild.co.jp/blog/develop/assets_c/2011/01/eclipse_Redmine10-thumb-640x441-554.jpg" style="" width="640" /></a></p>
<h4>
	８．次へボタンをクリックします。<a href="http://www.brainchild.co.jp/blog/develop/assets_c/2011/01/eclipse_Redmine11-557.html" onclick="window.open('http://www.brainchild.co.jp/blog/develop/assets_c/2011/01/eclipse_Redmine11-557.html','popup','width=797,height=550,scrollbars=no,resizable=no,toolbar=no,directories=no,location=no,menubar=no,status=no,left=0,top=0'); return false"><img alt="eclipse_Redmine11.jpg" class="mt-image-none" height="441" src="http://www.brainchild.co.jp/blog/develop/assets_c/2011/01/eclipse_Redmine11-thumb-640x441-557.jpg" style="" width="640" /></a></h4>
<h4>
	９．「使用条件の条項に同意します(A)」を選択し、完了ボタンをクリックします。<a href="http://www.brainchild.co.jp/blog/develop/assets_c/2011/01/eclipse_Redmine12-560.html" onclick="window.open('http://www.brainchild.co.jp/blog/develop/assets_c/2011/01/eclipse_Redmine12-560.html','popup','width=797,height=550,scrollbars=no,resizable=no,toolbar=no,directories=no,location=no,menubar=no,status=no,left=0,top=0'); return false"><img alt="eclipse_Redmine12.jpg" class="mt-image-none" height="441" src="http://www.brainchild.co.jp/blog/develop/assets_c/2011/01/eclipse_Redmine12-thumb-640x441-560.jpg" style="" width="640" /></a></h4>
<p>
	インストールが開始されますので、しばらく待ちます。</p>
<p>
	<img alt="eclipse_Redmine13.jpg" class="mt-image-none" height="178" src="http://www.brainchild.co.jp/blog/develop/assets_c/2011/01/eclipse_Redmine13-thumb-640x178-563.jpg" style="" width="640" /></p>
<p>
	警告が出たら、OKボタンをクリックします。</p>
<p>
	<img alt="eclipse_Redmine14.jpg" class="mt-image-none" height="116" src="http://www.brainchild.co.jp/blog/develop/assets_c/2011/01/eclipse_Redmine14-thumb-640x116-565.jpg" style="" width="640" /></p>
<h4>
	１０．Restart Nowボタンをクリックし、eclipseを再起動します。<img alt="eclipse_Redmine06.jpg" class="mt-image-none" height="116" src="http://www.brainchild.co.jp/blog/develop/assets_c/2011/01/eclipse_Redmine06-thumb-640x116-543.jpg" style="" width="640" /></h4>
<h4>
	&nbsp;</h4>
<p>
	以上で、Subversiveのインストールが完了します。</p>
<p>
	次回はMylynの設定をしてみたいと思います。</p>
<p>
	&nbsp;</p>]]>
        
    </content>
</entry>

<entry>
    <title>[Perl] 配列の処理 その１</title>
    <link rel="alternate" type="text/html" href="http://www.brainchild.co.jp/blog/develop/2010/11/PerlArray1.html" />
    <id>tag:www.brainchild.co.jp,2010:/blog/develop//2.81</id>

    <published>2010-11-28T15:04:22Z</published>
    <updated>2010-11-30T13:17:42Z</updated>

    <summary> 	sekです。 	他の言語でもおなじみの配列ですが、Java・ActionSc...</summary>
    <author>
        <name>sek</name>
        <uri>http://www.brainchild.co.jp/</uri>
    </author>
    
        <category term="Perl" scheme="http://www.sixapart.com/ns/types#category" />
    
    
    <content type="html" xml:lang="ja" xml:base="http://www.brainchild.co.jp/blog/develop/">
        <![CDATA[<p>
	sekです。</p>
<p>
	他の言語でもおなじみの配列ですが、Java・ActionScript 等の配列とは一味違う使い方があり、面白いので紹介します。</p>
<p>
	<br />
	初めに配列の説明を簡単に・・・・</p>
<p>
	配列とは、スカラー変数の集合に順序を付けて並べた値を格納する変数のことで、「@変数名」で表せます。</p>
<p>
	例えば、6種類のビタミンをまとめて格納する配列変数を @vitamins として作成し、格納されたビタミンの最初から３つ(vitaminA, vitaminB1, vitaminC) を添え字を指定して表示するソースは以下の様に書きます。</p>
<pre class="brush:js;">@vitamins =  (&quot;vitaminA&quot;, &quot;vitaminB1&quot;, &quot;vitaminC&quot;, &quot;vitaminD&quot;, &quot;vitaminE&quot;, &quot;vitaminK&quot;);

print $vitamins[0];
print $vitamins[1];
print $vitamins[2];

# &quot;vitaminAvitaminB1vitaminC&quot; が表示されます</pre>
<p>
	<br />
	ちなみに、上記の配列は qw(中身をシングルクォートで囲まれた文字列として扱う) を使ってもう少し簡単に書けます。</p>
<pre class="brush:js;">@vitamins =  qw( vitaminA vitaminB1 vitaminC vitaminD vitaminE vitaminK );</pre>
<p>
	&nbsp;</p>
<p>
	ここからは、Perl 配列処理の中で特徴的なものとして、以下の3点についてサンプルソースを見ていきます。</p>
<p>
	(1)&nbsp; 配列末尾のインデクス取得<br />
	(2)&nbsp; 配列末尾の要素取得<br />
	(3) pop/push演算子と shift/unshift演算子について</p>
<h5>
	(1) 配列末尾のインデクスを調べるには 「$#配列名」 を使用する</h5>
<pre class="brush:js;">@vitamins =  qw( vitaminA vitaminB1 vitaminC vitaminD vitaminE vitaminK );

$end_index = $#vitamins;
print $vitamins[$end_index];

# &quot;vitaminK&quot; が表示されます
</pre>
<p>
	&nbsp;</p>
<h5>
	(2) 配列の添え字に 「-(マイナス)」 を使用できる</h5>
<p>
	例えば、配列の最後の要素の値を取得するには添え字に 「-1」 を指定します。</p>
<pre class="brush:js;">@vitamins =  qw( vitaminA vitaminB1 vitaminC vitaminD vitaminE vitaminK );

print $vitamins[-1];

# &quot;vitaminK&quot; が表示されます</pre>
<p>
	&nbsp;</p>
<h5>
	<strong>(3) 配列の末尾に対して処理をするなら「</strong><strong>pop</strong><strong>/</strong><strong>push」、</strong><strong> 配列の先頭に対して処理をするなら「shift/unshift」 を使用する<br />
	</strong></h5>
<p>
	pop演算子は、配列の末尾の値を取り出します。取り出した値は配列からは取り除かれます。</p>
<p>
	逆に、push演算子は配列の末尾に指定した値を追加します。</p>
<pre class="brush:js;">@vitamins =  qw( vitaminA vitaminB1 vitaminC vitaminD vitaminE vitaminK );

$val = pop @vitamins;
print $val;

# &quot;vitaminK&quot; が表示されます

push @vitamins, &#39;vitaminM&#39;;
print $vitamins[-1];

# &quot;vitaminM&quot; が表示されます

</pre>
<p>
	<br />
	上記の pop/push 演算子と同じ働きだけれども、処理のターゲットを配列の先頭に変えた演算子が shift/unshift 演算子になります。</p>
<pre class="brush:js;">@vitamins =  qw( vitaminA vitaminB1 vitaminC vitaminD vitaminE vitaminK );

$val = shift @vitamins;
print $val;

# &quot;vitaminA&quot; が表示されます

unshift @vitamins, &#39;vitaminM&#39;;
print $vitamins[0];

# &quot;vitaminM&quot; が表示されます</pre>
<p>
	次回の 「配列の処理 その２」 は配列のソートについてです。</p>
]]>
        
    </content>
</entry>

<entry>
    <title>[Flex3]イベントフェーズについて その3</title>
    <link rel="alternate" type="text/html" href="http://www.brainchild.co.jp/blog/develop/2010/10/fflex-iventphase3.html" />
    <id>tag:www.brainchild.co.jp,2010:/blog/develop//2.80</id>

    <published>2010-10-27T16:45:26Z</published>
    <updated>2011-04-24T07:01:14Z</updated>

    <summary> 	イベントフェーズについて その1 では、3段階あるイベントフェーズの中で「タ...</summary>
    <author>
        <name>sek</name>
        <uri>http://www.brainchild.co.jp/</uri>
    </author>
    
        <category term="Flex" scheme="http://www.sixapart.com/ns/types#category" />
    
        <category term="Flex 3" scheme="http://www.sixapart.com/ns/types#category" />
    
    
    <content type="html" xml:lang="ja" xml:base="http://www.brainchild.co.jp/blog/develop/">
        <![CDATA[<p>
	<a href="http://www.brainchild.co.jp/blog/develop/2010/09/flex-iventphase1.html">イベントフェーズについて その1</a> では、3段階あるイベントフェーズの中で「ターゲット段階」・「バブリング段階」 をとりあげ、<br />
	<a href="http://www.brainchild.co.jp/blog/develop/2010/09/flex-iventphase2.html">イベントフェーズについて その2</a> では、残りのイベントフェーズ 「キャプチャ段階」をとりあげました。</p>
<p>
	今回は、イベントの伝播を止める方法について見ていきたいと思います。<br />
	早速 <a href="http://livedocs.adobe.com/flash/9.0_jp/ActionScriptLangRefV3/" target="_blank">Adobe Flex3 API </a>を調べてみると、イベントの伝播を停止する方法として次の2つのメソッドが用意されていることがわかります。<br />
	(今回のサンプルでは stopPropagation を使用しています)</p>
<p>
	<br />
	-----　<a href="http://livedocs.adobe.com/flash/9.0_jp/ActionScriptLangRefV3/flash/events/Event.html#stopImmediatePropagation%28%29" target="_blank">APIに記載されている説明</a>の引用　-----</p>
<h5>
	stopImmediatePropagation()</h5>
<pre class="normal">イベントフローの現在のノードおよび後続するノードで、イベントリスナーが処理されないようにします。このメソッドはすぐに有効になり、現在のノードのイベントリスナーに影響します。これに対し、stopPropagation() メソッドは、現在のノードのイベントリスナーの処理がすべて終了するまで有効になりません。
</pre>
<h5>
	stopPropagation()</h5>
<pre class="normal">イベントフローの現在のノードに後続するノードで、イベントリスナーが処理されないようにします。このメソッドは、現在のノード（currentTarget）のイベントリスナーには影響しません。 これに対し、stopImmediatePropagation() メソッドは、現在のノードとそれ以降のノードで、イベントリスナーが処理されないようにします。このメソッドを繰り返し呼び出しても影響はありません。このメソッドは、イベントフローの任意の段階で呼び出すことができます。</pre>
<p>
	&nbsp;</p>
<p>
	さっそくイベント伝播を停めるメソッドを使用したサンプルを見ていきましょう。</p>
<p>
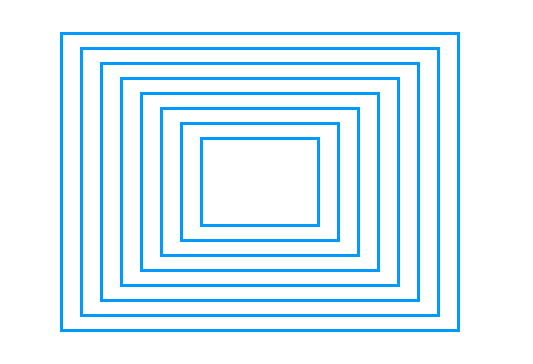
	今回用意したサンプルは、予め用意されたBoxコンポーネント(生成時にマウスクリックのイベントリスナーをはっている)が8層の入れ子構造になっており、各Box上でマウスがクリックされるとイベントの伝播によってターゲットよりも外側のBoxのボーダライン色が青&hArr;赤に切り替わる様になっています。ただし、今回のポイントは一番外側のBoxに関してはイベント伝播の影響を受けず、自身のBoxがクリックされない限りボーダライン色は切り替わらない仕組みになっています。</p>
<p>
	実際に実行した際の初期画面はこんな感じです。</p>
<p>
	<img alt="init.PNG" class="mt-image-center" height="364" src="http://www.brainchild.co.jp/blog/develop/init.PNG" style="text-align: center; display: block; margin: 0pt auto 20px;" width="533" /></p>
<p>
	まずはBoxコンポーネント側のサンプルソースからみていきます。BoxコンポーネントのcreationCompleteイベントでマウスクリックイベントのリスナーを作成し、そのハンドラーでボーダーラインの色を切り替えています。</p>
<pre class="brush:js;">&lt;?xml version=&quot;1.0&quot; encoding=&quot;utf-8&quot;?&gt;
&lt;mx:Box xmlns:mx=&quot;http://www.adobe.com/2006/mxml&quot;
     horizontalAlign=&quot;center&quot; verticalAlign=&quot;middle&quot;
     borderStyle=&quot;solid&quot; borderColor=&quot;#0099FF&quot; borderThickness=&quot;3&quot;
     creationComplete=&quot;onCC()&quot; &gt;
&lt;mx:Script&gt;
    &lt;![CDATA[
   
        private var _redBorder:Boolean = false;
       
        public function set redBorder(isRed:Boolean):void{
            _redBorder = isRed;
        }

        private function onCC():void{
            this.addEventListener(MouseEvent.CLICK, onClickHandler);
        }
       
        private function onClickHandler(e:MouseEvent):void{
           
            this._redBorder = !_redBorder;
           
            if(_redBorder){
                e.currentTarget.setStyle(&quot;borderColor&quot;, &quot;#ff4400&quot;);
            }else{
                e.currentTarget.setStyle(&quot;borderColor&quot;, &quot;#0099FF&quot;);
            }
        }
               
    ]]&gt;
&lt;/mx:Script&gt;
&lt;/mx:Box&gt;
</pre>
<p>
	次に実行ファイル側のサンプルソースを見ていきます。</p>
<p>
	layerBox0 ～ layerBox7までのBoxコンポーネントが入れ子構造になっており、application のcreationCompleteイベントで layerBox2 に対してマウスクリックイベントのリスナーを作成し、そのハンドラーで stopPropagation を実行しています。こうすることで イベントの伝播を layerBox2 で停止し、これ以上外側(layerBox1, layerBox0 )へ伝播しない様に設定しています。</p>
<pre class="brush:js;">&lt;?xml version=&quot;1.0&quot; encoding=&quot;utf-8&quot;?&gt;
&lt;mx:Application xmlns:mx=&quot;http://www.adobe.com/2006/mxml&quot; xmlns:Comp=&quot;Comp.*&quot;
    layout=&quot;vertical&quot; backgroundColor=&quot;#FFFFFF&quot;
    backgroundGradientAlphas=&quot;[1.0, 1.0]&quot; backgroundGradientColors=&quot;[#FFFFFF, #FFFFFF]&quot;
    horizontalAlign=&quot;center&quot; verticalAlign=&quot;middle&quot;
    creationComplete=&quot;onCC()&quot;&gt;
&lt;mx:Script&gt;
    &lt;![CDATA[
       
        private function onCC():void{
            layerBox2.addEventListener(MouseEvent.CLICK, onclickHandler);
        }
       
        private function onclickHandler(e:Event):void{
            e.stopPropagation();
        }
       
    ]]&gt;
&lt;/mx:Script&gt;
    &lt;Comp:Square id=&quot;layerBox0&quot; width=&quot;400&quot; height=&quot;300&quot; &gt;
      &lt;Comp:Square id=&quot;layerBox1&quot; width=&quot;360&quot; height=&quot;270&quot;&gt;
    　  &lt;Comp:Square id=&quot;layerBox2&quot; width=&quot;320&quot; height=&quot;240&quot;&gt;
    　   &lt;Comp:Square id=&quot;layerBox3&quot; width=&quot;280&quot; height=&quot;210&quot;&gt;
    　　  &lt;Comp:Square id=&quot;layerBox4&quot; width=&quot;240&quot; height=&quot;180&quot;&gt;
    　　　 &lt;Comp:Square id=&quot;layerBox5&quot; width=&quot;200&quot; height=&quot;150&quot;&gt;
    　　　  &lt;Comp:Square id=&quot;layerBox6&quot; width=&quot;160&quot; height=&quot;120&quot;&gt;
    　　　   &lt;Comp:Square id=&quot;layerBox7&quot; width=&quot;120&quot; height=&quot;90&quot; /&gt;
           &lt;/Comp:Square&gt;
          &lt;/Comp:Square&gt;
         &lt;/Comp:Square&gt;       
        &lt;/Comp:Square&gt;
       &lt;/Comp:Square&gt;
      &lt;/Comp:Square&gt;
     &lt;/Comp:Square&gt;
    &lt;/Comp:Square&gt;
&lt;/mx:Application&gt;

</pre>
<p>
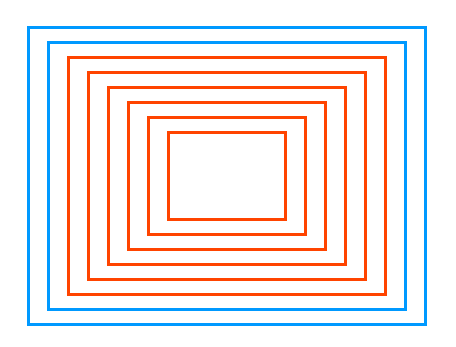
	例えば、一番内側のlayerBox7をクリックした際の結果は以下のようになります。</p>
<p>
	<img alt="stopPropagation.PNG" class="mt-image-center" height="347" src="http://www.brainchild.co.jp/blog/develop/stopPropagation.PNG" style="text-align: center; display: block; margin: 0pt auto 20px;" width="456" /></p>
<p>
	一番外側のBox枠線だけ色が変わらず、残りの枠線は赤色に切り替わりました。<br />
	イベントフェーズの順番に処理を追っていくと・・・・</p>
<p>
	1. 　「キャプチャ段階」 では イベントリスナーを設定していない為、何も処理は行われない<br />
	2. 　「ターゲット段階」で クリックされた layerBox7 の枠線の色を赤色にセットします<br />
	3. 　「バブリング段階」で layerBox6 から外側に向かって順に枠線の色を赤色にセットします<br />
	4.　 layerBox2 までバブリングしてきた後、layerBox2 で stopPropagation() が実行されます<br />
	5. 　stopPropagation() の実行により、伝播は中止されlayerBox1及びlayerBox0 では枠線の色が変わらない</p>
<p>
	という流れになります。</p>
<p>
	ちなみにですが、stopPropagation() は<strong>イベントの伝播を停める</strong>メソッドですので、layerBox0 をクリックしたときには 「ターゲット段階」の処理として layerBox0 の枠線の色は赤色に切り替わります。この場合は、イベントフェーズ対象に layerBox2 が登場しないのであたりまえといえばあたりまえですね。　(私はサンプル作成中に少しだけ混乱しました。ほんの少しだけ)</p>
<p>
	&nbsp;</p>
<p>
	全3回に渡ってイベントフェーズとイベント伝播の停止を見てきました。サンプルソースが単純なので、その便利さがいまいち伝わらなかったかもしれませんが、イベント送信 + イベント伝播 + イベント停止 の使い方を覚えると画面の作り込みが楽しくなってきます。　是非応用して楽しい画面をつくってみてください。</p>]]>
        
    </content>
</entry>

<entry>
    <title>[Flex3]イベントフェーズについて その2</title>
    <link rel="alternate" type="text/html" href="http://www.brainchild.co.jp/blog/develop/2010/09/flex-iventphase2.html.html" />
    <id>tag:www.brainchild.co.jp,2010:/blog/develop//2.77</id>

    <published>2010-09-30T14:59:59Z</published>
    <updated>2010-10-01T15:27:16Z</updated>

    <summary> 	イベントフェーズについて その1では、3段階あるイベントフェーズの中で 「タ...</summary>
    <author>
        <name>sek</name>
        <uri>http://www.brainchild.co.jp/</uri>
    </author>
    
        <category term="Flex 3" scheme="http://www.sixapart.com/ns/types#category" />
    
    
    <content type="html" xml:lang="ja" xml:base="http://www.brainchild.co.jp/blog/develop/">
        <![CDATA[<p>
	<a href="http://www.brainchild.co.jp/blog/develop/2010/09/flex-iventphase1.html">イベントフェーズについて その1</a>では、3段階あるイベントフェーズの中で 「ターゲット段階」・「バブリング段階」 に着目し、その仕組みをサンプルアプリの結果を見ながら確認しました。</p>
<p>
	今回は、残りのイベントフェーズ 「キャプチャ段階」について、私が勘違いしてしまったポイントも交えながら確認していきたいと思います。</p>
<p>
	まずは、キャプチャ段階のイベントをリスナーでキャッチさせる為に addEventListener メソッドの3番目の引数である useCapture を true に設定します。<br />
	(useCapture はデフォルトでは false に設定されています。つまり、ここのスイッチを変えない限り通常のイベントリスナーではキャプチャ段階は無視されています)</p>
<p>
	Flex3 API はこんな感じに書かれています。</p>
<p>
	<img alt="addEventListener.PNG" class="mt-image-center" height="61" src="http://www.brainchild.co.jp/blog/develop/addEventListener.PNG" style="margin: 0pt auto 20px; text-align: center; display: block;" width="709" /></p>
<p>
	&nbsp;</p>
<p>
	今回のサンプルアプリではキャプチャ段階もリスナー対象としたいので、前回サンプルコードのinnerBox・middleBox・outerBox に登録したイベントリスナーの useCapture を true にします。</p>
<pre class="brush:js;">            private function onCreationComplete():void{   
                innerBox.addEventListener(MouseEvent.CLICK, onCatchDispatcher, true);
                middleBox.addEventListener(MouseEvent.CLICK, onCatchDispatcher, true);
                outerBox.addEventListener(MouseEvent.CLICK, onCatchDispatcher, true);
            }
</pre>
<p>
	これでキャプチャ段階の設定がわかったので、前回サンプリコードの上記部分だけを変更して 実行すると 「キャプチャ段階」・「ターゲット段階」・「バブリング段階」 のすべてでイベントをキャッチできる！ 　・・・・・と思っていましたが、そうはいきませんでした。</p>
<p>
	実際の実行結果はこれです。</p>
<p>
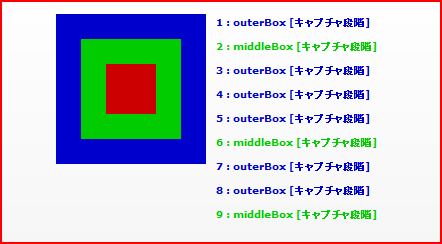
	<img alt="capturePhase_only.PNG" class="mt-image-center" height="244" src="http://www.brainchild.co.jp/blog/develop/capturePhase_only.PNG" style="margin: 0pt auto 20px; text-align: center; display: block;" width="442" /></p>
<p>
	・・・いくらクリックしてもキャプチャ段階のイベントしかキャッチできていません。</p>
<p>
	&nbsp;</p>
<p>
	Flex3 API の続きを読んでみるとちゃんと書いてありました。以下はAPI 説明からの引用です。</p>
<p>
	<code>「useCapture</code> を <code>true</code> に設定すると、リスナーはキャプチャ段階のみでイベントを処理し、ターゲット段階またはバブリング段階では処理しません。 <code>useCapture</code> を <code>false</code> に設定すると、リスナーはターゲット段階またはバブリング段階のみでイベントを処理します。 3 つの段階すべてでイベントを受け取るには、<code>addEventListener()</code> を 2 回呼び出します。<code>useCapture</code> を <code>true</code> に設定して 1 回呼び出し、<code>useCapture</code> を <code>false</code> に設定してもう 1 回呼び出します。」</p>
<p>
	ポイントとしては、イベントフェーズは3段階存在しているけれども、実際にはキャプチャー段階 と ターゲット段階+バブリング段階 の2種類でリスナー処理を登録してやらないといけないこと。 つまり3段階すべてでリスナー処理をさせるには、<code>useCapture</code> スイッチを切り替えた2つの addEventListener を発行してやらなければいけないみたいです。　なるほど。</p>
<p>
	&nbsp;</p>
<p>
	以下が、私の勘違いを正した今回のサンプルアプリ用のコードです。</p>
<pre class="brush:js;">&lt;?xml version=&quot;1.0&quot; encoding=&quot;utf-8&quot;?&gt;
&lt;mx:Application xmlns:mx=&quot;http://www.adobe.com/2006/mxml&quot; layout=&quot;horizontal&quot; horizontalAlign=&quot;center&quot; backgroundColor=&quot;#FFFFFF&quot;
     creationComplete=&quot;onCreationComplete()&quot; &gt;
     
    &lt;mx:Script&gt;
        &lt;![CDATA[
            import mx.controls.Label;
       
            private var counter:int = 1;
           
            private function onCreationComplete():void{   
                innerBox.addEventListener(MouseEvent.CLICK, onCatchDispatcher);
                innerBox.addEventListener(MouseEvent.CLICK, onCatchDispatcher,true);
                middleBox.addEventListener(MouseEvent.CLICK, onCatchDispatcher);
                middleBox.addEventListener(MouseEvent.CLICK, onCatchDispatcher, true);
                outerBox.addEventListener(MouseEvent.CLICK, onCatchDispatcher);
                outerBox.addEventListener(MouseEvent.CLICK, onCatchDispatcher, true);
            }
           
            private function onCatchDispatcher(e:MouseEvent):void{
                var lbl:Label = new Label();
                var phase:String = getPhase(e.eventPhase);
                lbl.text = counter + &quot; : &quot; + e.currentTarget.id + &quot; [&quot; + phase + &quot;]&quot;;
                setLabelColor(lbl, e.currentTarget.id);
                eventList.addChild(lbl);
                counter++;
            }
           
            private function getPhase(eventPhase:int):String{   
                var phase:String;
                //EventPhase 1=キャプチャ段階, 2=ターゲット段階, 3=バブリング段階
                switch(eventPhase){
                    case 1:
                        phase = &quot;キャプチャ段階&quot;;
                        break;
                    case 2:
                        phase = &quot;ターゲット段階&quot;;
                        break;
                    case 3:
                        phase = &quot;バブリング段階&quot;;
                        break;
                }
               
                return phase;
            }
           
            private function setLabelColor(lbl:Label, targetBox:String):void{       
                if(targetBox == &quot;innerBox&quot;){
                    lbl.setStyle(&quot;color&quot;, &quot;#CC0000&quot;);
                }else if(targetBox == &quot;middleBox&quot;){
                    lbl.setStyle(&quot;color&quot;, &quot;#00cc00&quot;);
                }else if(targetBox == &quot;outerBox&quot;){
                    lbl.setStyle(&quot;color&quot;, &quot;#0000CC&quot;);
                }
            }

        ]]&gt;
    &lt;/mx:Script&gt;
    &lt;mx:HBox&gt;
        &lt;mx:VBox id=&quot;outerBox&quot; minHeight=&quot;150&quot; minWidth=&quot;150&quot; horizontalAlign=&quot;center&quot; verticalAlign=&quot;middle&quot; backgroundColor=&quot;#0000CC&quot;&gt;
            &lt;mx:VBox id=&quot;middleBox&quot; minHeight=&quot;100&quot; minWidth=&quot;100&quot; horizontalAlign=&quot;center&quot; verticalAlign=&quot;middle&quot; backgroundColor=&quot;#00CC00&quot;&gt;
                &lt;mx:VBox id=&quot;innerBox&quot; minHeight=&quot;50&quot; minWidth=&quot;50&quot; horizontalAlign=&quot;center&quot; verticalAlign=&quot;middle&quot; backgroundColor=&quot;#CC0000&quot; /&gt;
            &lt;/mx:VBox&gt;
        &lt;/mx:VBox&gt;
        &lt;mx:VBox id=&quot;eventList&quot; fontWeight=&quot;bold&quot; /&gt;
    &lt;/mx:HBox&gt;

&lt;/mx:Application&gt;
</pre>
<p>
	&nbsp;</p>
<p>
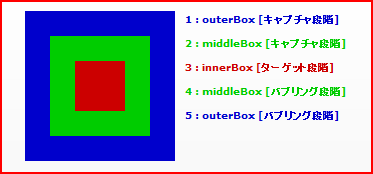
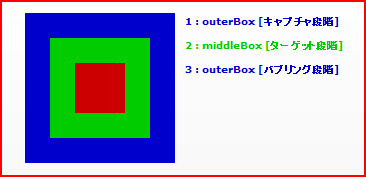
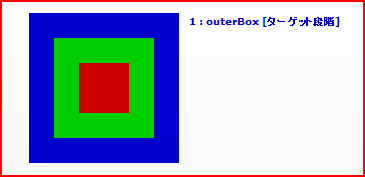
	実際にサンプルアプリを動かしてみるとちゃんと3段階のイベントフェーズを確認することができました。</p>
<p>
	①　一番内側の innerBox をクリックした場合</p>
<p>
	<img alt="innerBox.PNG" class="mt-image-center" height="174" src="http://www.brainchild.co.jp/blog/develop/innerBox.PNG" style="margin: 0pt auto 20px; text-align: center; display: block;" width="373" /></p>
<p>
	②　次に内側の middleBox をクリックした場合</p>
<p>
	<img alt="middleBox.PNG" class="mt-image-center" height="177" src="http://www.brainchild.co.jp/blog/develop/middleBox.PNG" style="margin: 0pt auto 20px; text-align: center; display: block;" width="366" /></p>
<p>
	③　一番外側の outerBox をクリックした場合</p>
<p>
	<img alt="outerBox.PNG" class="mt-image-center" height="177" src="http://www.brainchild.co.jp/blog/develop/outerBox.PNG" style="margin: 0pt auto 20px; text-align: center; display: block;" width="365" /></p>
<p>
	&nbsp;</p>
<p>
	イベント伝播の機能はとても便利ですが、ここには伝播して欲しくないないんだよなーという場合もあると思います。</p>
<p>
	次回は伝播の止め方について確認していきたいと思います。</p>
]]>
        
    </content>
</entry>

<entry>
    <title>[Flex3]イベントフェーズについて その１</title>
    <link rel="alternate" type="text/html" href="http://www.brainchild.co.jp/blog/develop/2010/09/flex-iventphase1.html" />
    <id>tag:www.brainchild.co.jp,2010:/blog/develop//2.73</id>

    <published>2010-09-30T12:39:06Z</published>
    <updated>2010-10-01T15:29:18Z</updated>

    <summary> 	イベントフェーズとは、イベントがトリガされた時にイベントリスナーが存在するか...</summary>
    <author>
        <name>sek</name>
        <uri>http://www.brainchild.co.jp/</uri>
    </author>
    
        <category term="Flex" scheme="http://www.sixapart.com/ns/types#category" />
    
        <category term="Flex 3" scheme="http://www.sixapart.com/ns/types#category" />
    
    
    <content type="html" xml:lang="ja" xml:base="http://www.brainchild.co.jp/blog/develop/">
        <![CDATA[<p>
	イベントフェーズとは、イベントがトリガされた時にイベントリスナーが存在するかを確認する順番(段階)のことで、次の３段階構成になっています。</p>
<p>
	[ <strong>キャプチャ段階</strong> ]　&rarr;　[<strong> ターゲット段階 </strong>]　&rarr;　[<strong> バブリング段階 </strong>]</p>
<p>
	　●キャプチャ段階<br />
	　　イベントが発行されたターゲットの祖先の表示リストを親側から順に検査し、リスナーが登録されているかを確認します。</p>
<p>
	　●ターゲット段階<br />
	　　イベントが発行されたターゲットのリスナーが呼び出されます。</p>
<p>
	　●バブリング段階<br />
	　　イベントが発行されたターゲットの祖先の表示リストをターゲット側から順に検査し、リスナーが登録されているかを確認します。</p>
<p>
	今回の その１ ではターゲット段階とバブリング段階に着目し、サンプルソースを通してイベントフェーズを確認していきます。</p>
<p>
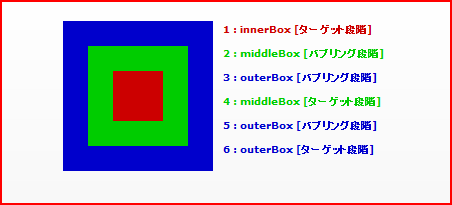
	以下のサンプルソースは、入れ子構造の3つのVBox (外側から outerBox - middleBox - innerBox という id を付加) を用意し、ApplicationのcreationCompleteイベント処理で各々のVBoxにクリックイベントのリスナーを発行します。<br />
	サンプルソースを実行し何れかのVBoxをクリックすると、クリックイベントの処理として<br />
	　「　&quot;リスナー処理対象VBoxのid&quot;：&quot;処理連番&quot;[&quot;イベントフェーズ段階&quot;]　」 <br />
	が右側にリスト表示されます。　わかりやすい様に文字色はVBoxの背景色と同色にセットしています。</p>
<pre class="brush:js;">&lt;?xml version=&quot;1.0&quot; encoding=&quot;utf-8&quot;?&gt;
&lt;mx:Application xmlns:mx=&quot;http://www.adobe.com/2006/mxml&quot; layout=&quot;horizontal&quot; horizontalAlign=&quot;center&quot; backgroundColor=&quot;#FFFFFF&quot;
     creationComplete=&quot;onCreationComplete()&quot; &gt;
     
    &lt;mx:Script&gt;
        &lt;![CDATA[
            import mx.controls.Label;
       
            private var counter:int = 1;
           
            private function onCreationComplete():void{   
                innerBox.addEventListener(MouseEvent.CLICK, onCatchDispatcher);
                middleBox.addEventListener(MouseEvent.CLICK, onCatchDispatcher);
                outerBox.addEventListener(MouseEvent.CLICK, onCatchDispatcher);
            }
           
            private function onCatchDispatcher(e:MouseEvent):void{
                var lbl:Label = new Label();
                var phase:String = getPhase(e.eventPhase);
                lbl.text = counter + &quot; : &quot; + e.currentTarget.id + &quot; [&quot; + phase + &quot;]&quot;;
                setLabelColor(lbl, e.currentTarget.id);
                eventList.addChild(lbl);
                counter++;
            }
           
            private function getPhase(eventPhase:int):String{   
                var phase:String;
                //EventPhase 1=キャプチャ段階, 2=ターゲット段階, 3=バブリング段階
                switch(eventPhase){
                    case 1:
                        phase = &quot;キャプチャ段階&quot;;
                        break;
                    case 2:
                        phase = &quot;ターゲット段階&quot;;
                        break;
                    case 3:
                        phase = &quot;バブリング段階&quot;;
                        break;
                }
               
                return phase;
            }
           
            private function setLabelColor(lbl:Label, targetBox:String):void{       
                if(targetBox == &quot;innerBox&quot;){
                    lbl.setStyle(&quot;color&quot;, &quot;#CC0000&quot;);
                }else if(targetBox == &quot;middleBox&quot;){
                    lbl.setStyle(&quot;color&quot;, &quot;#00CC00&quot;);
                }else if(targetBox == &quot;outerBox&quot;){
                    lbl.setStyle(&quot;color&quot;, &quot;#0000CC&quot;);
                }
            }

        ]]&gt;
    &lt;/mx:Script&gt;
    &lt;mx:HBox&gt;
        &lt;mx:VBox id=&quot;outerBox&quot; minHeight=&quot;150&quot; minWidth=&quot;150&quot; horizontalAlign=&quot;center&quot; verticalAlign=&quot;middle&quot; backgroundColor=&quot;#0000CC&quot;&gt;
            &lt;mx:VBox id=&quot;middleBox&quot; minHeight=&quot;100&quot; minWidth=&quot;100&quot; horizontalAlign=&quot;center&quot; verticalAlign=&quot;middle&quot; backgroundColor=&quot;#00CC00&quot;&gt;
                &lt;mx:VBox id=&quot;innerBox&quot; minHeight=&quot;50&quot; minWidth=&quot;50&quot; horizontalAlign=&quot;center&quot; verticalAlign=&quot;middle&quot; backgroundColor=&quot;#CC0000&quot; /&gt;
            &lt;/mx:VBox&gt;
        &lt;/mx:VBox&gt;
        &lt;mx:VBox id=&quot;eventList&quot; fontWeight=&quot;bold&quot; /&gt;
    &lt;/mx:HBox&gt;

&lt;/mx:Application&gt;
</pre>
<p>
	&nbsp;</p>
<p>
	【サンプルソースの実行】</p>
<p>
	①　一番内側の innerBox (赤色) を1回クリック<br />
	②　次に内側の middleBox (緑色) を1回クリック<br />
	③　一番外側の outerBox (青色) を1回クリック</p>
<p>
	上記①～③の手順で実行した際の結果はこうなりました。</p>
<p>
	<img alt="click_result.PNG" class="mt-image-center" height="205" src="http://www.brainchild.co.jp/blog/develop/click_result.PNG" style="margin: 0pt auto 20px; text-align: center; display: block;" width="452" /></p>
<p>
	手順①では一番内側のコンポーネントがクリックされたことにより、ターゲット段階として innerBox がリスナーが実行されます。その後、親コンポーネントへの伝播が働くことにより、バブリング段階として middleBox・outerBox の順にリスナーが実行されます。</p>
<p>
	手順②では middleBox がクリックされたので ターゲット段階として middleBoxのリスナーが実行され、バブリング段階として 親コンポーネントである outerBox のリスナーが実行されます。</p>
<p>
	手順③では、一番外側のコンポーネントのouterBox がクリックされたので、バブリング段階対象のコンポーネントは存在せず、ターゲット段階の outerBox のリスナーのみ実行されます。</p>
<p>
	つまり、イベント発行したコンポーネントはターゲット段階としてリスナーを実行し、イベント発行したコンポーネントよりも親のコンポーネントはバブリング段階としてリスナーを実行しています。<br />
	考え方はシンプルですが、1つのアクション(イベント)で複数個所のリスナーを動かせる非常に強力なしくみですよね。</p>
<p>
	<a href="http://www.brainchild.co.jp/blog/develop/2010/09/flex-iventphase2.html.html">次回</a>は、キャプチャ段階についてサンプルソースを見ながら確認したいと思います。</p>
]]>
        
    </content>
</entry>

<entry>
    <title>[Flex3]itemRendererのコンポーネントがtextプロパティを持っていない場合の対処方法</title>
    <link rel="alternate" type="text/html" href="http://www.brainchild.co.jp/blog/develop/2010/09/flex3itemrenderer2.html" />
    <id>tag:www.brainchild.co.jp,2010:/blog/develop//2.75</id>

    <published>2010-09-29T13:42:47Z</published>
    <updated>2010-09-29T13:53:35Z</updated>

    <summary> 	前回の「itemRendererで編集したデータをdataProviderに...</summary>
    <author>
        <name>suke</name>
        <uri>http://www.brainchild.co.jp/</uri>
    </author>
    
        <category term="Flex" scheme="http://www.sixapart.com/ns/types#category" />
    
        <category term="Flex 3" scheme="http://www.sixapart.com/ns/types#category" />
    
    
    <content type="html" xml:lang="ja" xml:base="http://www.brainchild.co.jp/blog/develop/">
        <![CDATA[<p>
	前回の「<a href="http://www.brainchild.co.jp/blog/develop/2010/09/flex3itemrenderer1.html">itemRendererで編集したデータをdataProviderに反映させる</a>」では、<br />
	itemRendererにtextInputを使用しました。<br />
	<br />
	今回はcheckBoxを使用してみます。<br />
	前回同様、2つのデータグリッド間でうまく連携できるでしょうか？<br />
	<br />
	サンプルコードは次の通りです。</p>
<pre class="brush: js;">&lt;?xml version=&quot;1.0&quot; encoding=&quot;utf-8&quot;?&gt;
&lt;mx:Application xmlns:mx=&quot;http://www.adobe.com/2006/mxml&quot; layout=&quot;absolute&quot;&gt;
	&lt;mx:Script&gt;
		&lt;![CDATA[
			import mx.collections.ArrayCollection;
			
            [Bindable]
            private var initDG:ArrayCollection = new ArrayCollection([
                {Album:true},
                {Album:true}
            ]);
 		]]&gt;
	&lt;/mx:Script&gt;
	&lt;mx:VBox&gt;
		&lt;mx:DataGrid id=&quot;dg1&quot; dataProvider=&quot;{initDG}&quot; width=&quot;300&quot; editable=&quot;true&quot;&gt;
			&lt;mx:columns&gt;
				&lt;mx:DataGridColumn headerText=&quot;Album&quot; dataField=&quot;Album&quot; rendererIsEditor=&quot;true&quot;&gt;
					&lt;mx:itemRenderer&gt;
						&lt;mx:Component&gt;
							&lt;mx:CheckBox/&gt;
						&lt;/mx:Component&gt;
					&lt;/mx:itemRenderer&gt;
				&lt;/mx:DataGridColumn&gt;
			&lt;/mx:columns&gt;
		&lt;/mx:DataGrid&gt;
		&lt;mx:DataGrid id=&quot;dg2&quot; dataProvider=&quot;{initDG}&quot; width=&quot;300&quot; editable=&quot;true&quot;&gt;
			&lt;mx:columns&gt;
				&lt;mx:DataGridColumn headerText=&quot;Album&quot; dataField=&quot;Album&quot; rendererIsEditor=&quot;true&quot;&gt;
					&lt;mx:itemRenderer&gt;
						&lt;mx:Component&gt;
							&lt;mx:CheckBox/&gt;
						&lt;/mx:Component&gt;
					&lt;/mx:itemRenderer&gt;
				&lt;/mx:DataGridColumn&gt;
			&lt;/mx:columns&gt;
		&lt;/mx:DataGrid&gt;
	&lt;/mx:VBox&gt;
&lt;/mx:Application&gt;


</pre>
<p>
	<br />
	前回からの変更点は以下4点。<br />
	　・itemRendererをテキストインプットからチェックボックスに変更<br />
	　・DataGridColumnのプロパティに「rendererIsEditor=true」を追加<br />
	　　※アイテムレンダラーをアイテムエディタとして使用するため<br />
	　・初期値（initDG）を文字列から「true」に変更<br />
	　　※チェックボックスに変更したため<br />
	　・確認ボタンと、押下時の処理を削除</p>
<p>
	&nbsp;</p>
<p>
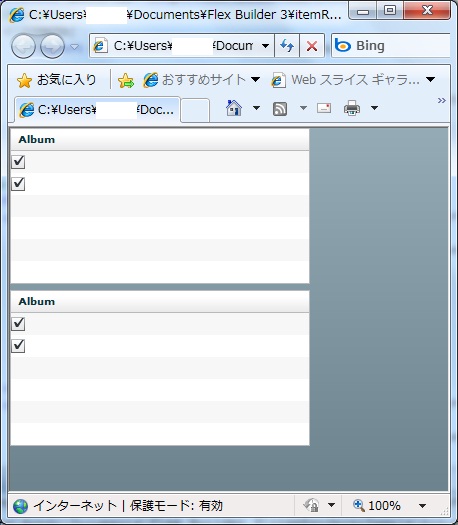
	それでは起動してみます。</p>
<p>
	<img alt="flex_itemrenderer2_01.jpg" class="mt-image-none" height="525" src="http://www.brainchild.co.jp/blog/develop/2010/09/29/flex_itemrenderer2_01.jpg" style="" width="458" /></p>
<p>
	&nbsp;</p>
<p>
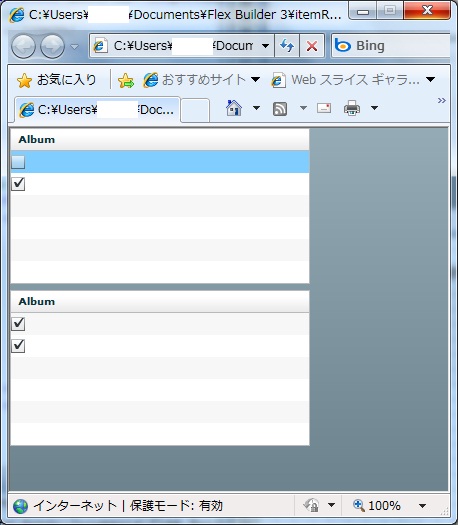
	1行目のチェックボックスの選択を解除してフォーカスアウトしてみます。</p>
<p>
	<img alt="flex_itemrenderer2_02.jpg" class="mt-image-none" height="525" src="http://www.brainchild.co.jp/blog/develop/2010/09/29/flex_itemrenderer2_02.jpg" style="" width="458" /></p>
<p>
	&nbsp;</p>
<p>
	そうすると次のエラーが発生しました。<br />
	<span style="color: rgb(255, 0, 0);">ReferenceError: Error #1069: itemRendererSample_inlineComponent1 にプロパティ text が見つからず、デフォルト値もありません。</span><br />
	<br />
	これは、DataGridColumnのeditorDataField プロパティのデフォルト値が 「text」なためです。<br />
	アイテムレンダラーで使用しているチェックボックスはtextプロパティを持っていません。<br />
	<br />
	これを解消するにはDataGridColumnのediterDataFieldプロパティにcheckBoxのプロパティである「selected」を指定します。<br />
	実際のコードは以下のようになります。</p>
<pre class="brush: js;">&lt;?xml version=&quot;1.0&quot; encoding=&quot;utf-8&quot;?&gt;
&lt;mx:Application xmlns:mx=&quot;http://www.adobe.com/2006/mxml&quot; layout=&quot;absolute&quot;&gt;
	&lt;mx:Script&gt;
		&lt;![CDATA[
			import mx.collections.ArrayCollection;
			
            [Bindable]
            private var initDG:ArrayCollection = new ArrayCollection([
                {Album:true},
                {Album:true}
            ]);
 		]]&gt;
	&lt;/mx:Script&gt;
	&lt;mx:VBox&gt;
		&lt;mx:DataGrid id=&quot;dg1&quot; dataProvider=&quot;{initDG}&quot; width=&quot;300&quot; editable=&quot;true&quot;&gt;
			&lt;mx:columns&gt;
				&lt;mx:DataGridColumn headerText=&quot;Album&quot; dataField=&quot;Album&quot; rendererIsEditor=&quot;true&quot; editorDataField=&quot;selected&quot;&gt;
					&lt;mx:itemRenderer&gt;
						&lt;mx:Component&gt;
							&lt;mx:CheckBox/&gt;
						&lt;/mx:Component&gt;
					&lt;/mx:itemRenderer&gt;
				&lt;/mx:DataGridColumn&gt;
			&lt;/mx:columns&gt;
		&lt;/mx:DataGrid&gt;
		&lt;mx:DataGrid id=&quot;dg2&quot; dataProvider=&quot;{initDG}&quot; width=&quot;300&quot; editable=&quot;true&quot;&gt;
			&lt;mx:columns&gt;
				&lt;mx:DataGridColumn headerText=&quot;Album&quot; dataField=&quot;Album&quot; rendererIsEditor=&quot;true&quot; editorDataField=&quot;selected&quot;&gt;
					&lt;mx:itemRenderer&gt;
						&lt;mx:Component&gt;
							&lt;mx:CheckBox/&gt;
						&lt;/mx:Component&gt;
					&lt;/mx:itemRenderer&gt;
				&lt;/mx:DataGridColumn&gt;
			&lt;/mx:columns&gt;
		&lt;/mx:DataGrid&gt;
	&lt;/mx:VBox&gt;
&lt;/mx:Application&gt;


</pre>
<p>
	&nbsp;</p>
<p>
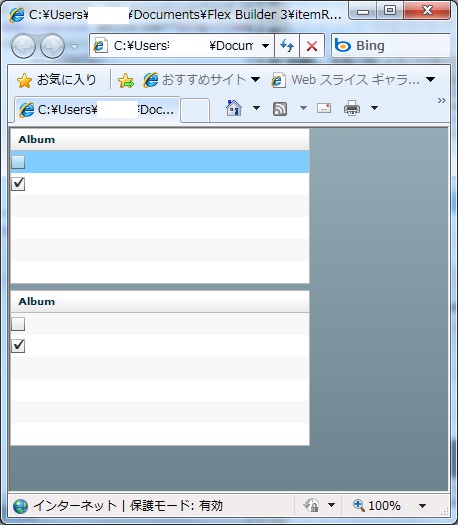
	早速起動して、先程と同じように1行目のチェックボックスの選択を解除してフォーカスアウトします。</p>
<p>
	<img alt="flex_itemrenderer2_03.jpg" class="mt-image-none" height="525" src="http://www.brainchild.co.jp/blog/develop/2010/09/29/flex_itemrenderer2_03.jpg" style="" width="458" /></p>
<p>
	&nbsp;</p>
<p>
	すると、今度はエラーも発生せず、データグリッド間の連携もうまくいきました。<br />
	<br />
	意外とはまりそうなので、覚え書きしておきました&hellip;</p>
]]>
        
    </content>
</entry>

<entry>
    <title>[Flex3]itemRendererで編集したデータをdataProviderに反映させる</title>
    <link rel="alternate" type="text/html" href="http://www.brainchild.co.jp/blog/develop/2010/09/flex3itemrenderer1.html" />
    <id>tag:www.brainchild.co.jp,2010:/blog/develop//2.74</id>

    <published>2010-09-28T15:49:59Z</published>
    <updated>2010-09-28T16:05:36Z</updated>

    <summary> 	データグリッドなどのリストコントロールで、アイテムレンダラーに編集可能なコン...</summary>
    <author>
        <name>suke</name>
        <uri>http://www.brainchild.co.jp/</uri>
    </author>
    
        <category term="Flex" scheme="http://www.sixapart.com/ns/types#category" />
    
        <category term="Flex 3" scheme="http://www.sixapart.com/ns/types#category" />
    
    
    <content type="html" xml:lang="ja" xml:base="http://www.brainchild.co.jp/blog/develop/">
        <![CDATA[<p>
	データグリッドなどのリストコントロールで、アイテムレンダラーに編集可能なコンポーネントを使用して<br />
	変更したデータ内容をデータプロバイダに戻す方法をご紹介します。<br />
	<br />
	早速、検証用アプリで動作確認を行っていきましょう。<br />
	サンプルソースは以下の通りです。</p>
<pre class="brush: js;">&lt;?xml version=&quot;1.0&quot; encoding=&quot;utf-8&quot;?&gt;
&lt;mx:Application xmlns:mx=&quot;http://www.adobe.com/2006/mxml&quot; layout=&quot;absolute&quot;&gt;
	&lt;mx:Script&gt;
		&lt;![CDATA[
			import mx.controls.Alert;
			import mx.collections.ArrayCollection;
			
            [Bindable]
            private var initDG:ArrayCollection = new ArrayCollection([
                {Album:&#39;Slanted and Enchanted&#39;},
                {Album:&#39;Brighten the Corners&#39;}
            ]);
            
            //inidDGの内容を表示します
            private function checkBtnHandler():void {
            	Alert.show(
            		&quot;initDGの内容確認&quot; + &quot;\n\n&quot; +
            		&quot;(0)=&quot; + Object(initDG.getItemAt(0))[&quot;Album&quot;].toString() + &quot;\n&quot; +
            		&quot;(1)=&quot; + Object(initDG.getItemAt(1))[&quot;Album&quot;].toString()
            	);
            }
 		]]&gt;
	&lt;/mx:Script&gt;
	&lt;mx:VBox&gt;
		&lt;mx:DataGrid id=&quot;dg1&quot; dataProvider=&quot;{initDG}&quot; width=&quot;300&quot;&gt;
			&lt;mx:columns&gt;
				&lt;mx:DataGridColumn headerText=&quot;Album&quot; dataField=&quot;Album&quot;&gt;
					&lt;mx:itemRenderer&gt;
						&lt;mx:Component&gt;
							&lt;mx:TextInput/&gt;
						&lt;/mx:Component&gt;
					&lt;/mx:itemRenderer&gt;
				&lt;/mx:DataGridColumn&gt;
			&lt;/mx:columns&gt;
		&lt;/mx:DataGrid&gt;
				
		&lt;mx:Button label=&quot;check!!&quot; id=&quot;checkBtn&quot; click=&quot;checkBtnHandler()&quot;/&gt;
	&lt;/mx:VBox&gt;
&lt;/mx:Application&gt;


</pre>
<p>
	&nbsp;</p>
<p>
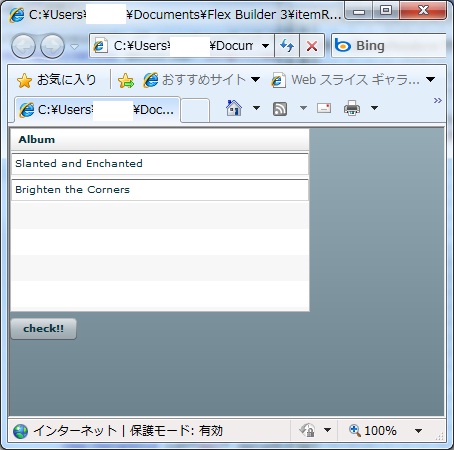
	起動直後の画面です。</p>
<p>
	<img alt="flex_itemrenderer1_01.jpg" class="mt-image-none" height="450" src="http://www.brainchild.co.jp/blog/develop/2010/09/29/flex_itemrenderer1_01.jpg" style="" width="454" /></p>
<p>
	&nbsp;</p>
<p>
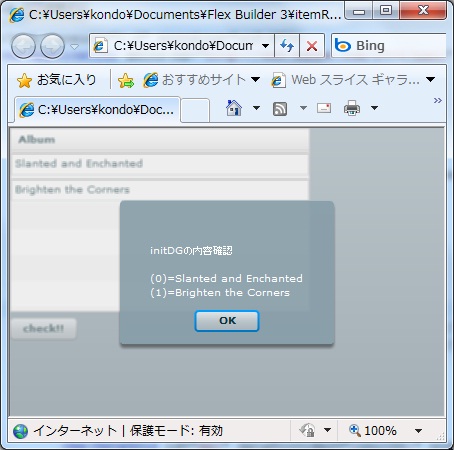
	「check!!」ボタンを押下し、データプロバイダにバインディングしている変数（initDG）の内容を確認しておきます。</p>
<p>
	<img alt="flex_itemrenderer1_02.jpg" class="mt-image-none" height="450" src="http://www.brainchild.co.jp/blog/develop/2010/09/29/flex_itemrenderer1_02.jpg" style="" width="454" /></p>
<p>
	&nbsp;</p>
<p>
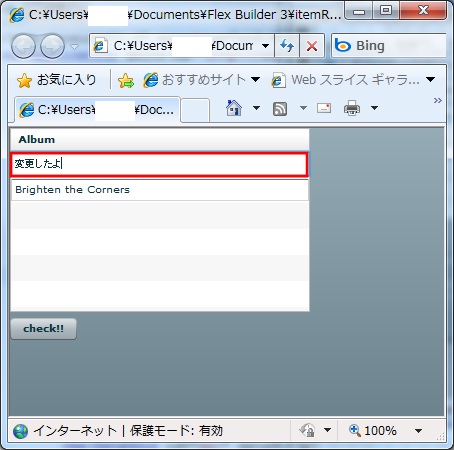
	次に1行目のデータを変更します。</p>
<p>
	<img alt="flex_itemrenderer1_03.jpg" class="mt-image-none" height="450" src="http://www.brainchild.co.jp/blog/develop/2010/09/29/flex_itemrenderer1_03.jpg" style="" width="454" /></p>
<p>
	&nbsp;</p>
<p>
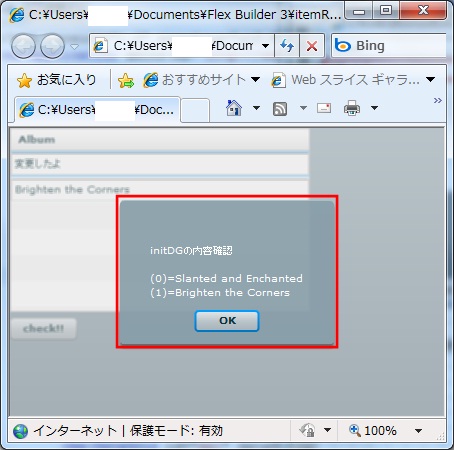
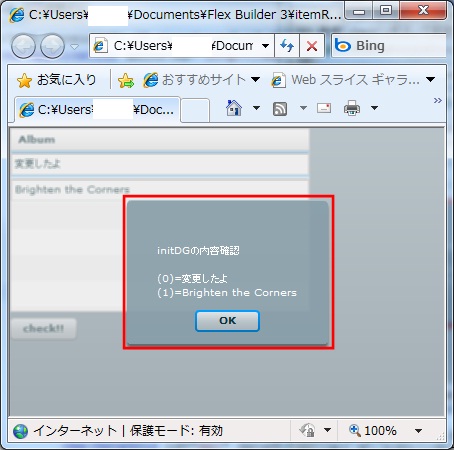
	再度「check!!」ボタンで変数（initDG）の内容を確認してみます。</p>
<p>
	<img alt="flex_itemrenderer1_04.jpg" class="mt-image-none" height="450" src="http://www.brainchild.co.jp/blog/develop/2010/09/29/flex_itemrenderer1_04.jpg" style="" width="454" /></p>
<p>
	&nbsp;</p>
<p>
	結果は、先程と変わっていません。<br />
	つまり、データプロバイダに反映されていないことになります。</p>
<p>
	&nbsp;</p>
<p>
	では、サンプルコードを修正してみましょう。<br />
	データグリッドのeditableプロパティに「true」を設定してみます。</p>
<pre class="brush: js;">		&lt;mx:DataGrid id=&quot;dg1&quot; dataProvider=&quot;{initDG}&quot; width=&quot;300&quot; editable=&quot;true&quot;&gt;
			&lt;mx:columns&gt;
				&lt;mx:DataGridColumn headerText=&quot;Album&quot; dataField=&quot;Album&quot;&gt;
					&lt;mx:itemRenderer&gt;
						&lt;mx:Component&gt;
							&lt;mx:TextInput/&gt;
						&lt;/mx:Component&gt;
					&lt;/mx:itemRenderer&gt;
				&lt;/mx:DataGridColumn&gt;
			&lt;/mx:columns&gt;
		&lt;/mx:DataGrid&gt;
</pre>
<p>
	<br />
	起動後、先程と同様に1行目のデータを変更して「check!!」ボタンを押下します。</p>
<p>
	<img alt="flex_itemrenderer1_05.jpg" class="mt-image-none" height="450" src="http://www.brainchild.co.jp/blog/develop/2010/09/29/flex_itemrenderer1_05.jpg" style="" width="454" /></p>
<p>
	&nbsp;</p>
<p>
	データプロバイダに反映されていることが確認できました。<br />
	editableを「true」にすることで、データプロバイダ内のアイテムを編集することが可能となります。<br />
	<br />
	これを拡張して、2つのデータグリッド間でデータの同期を取るように作り変えてみましょう。<br />
	サンプルソースは以下になります。</p>
<pre class="brush: js;">&lt;?xml version=&quot;1.0&quot; encoding=&quot;utf-8&quot;?&gt;
&lt;mx:Application xmlns:mx=&quot;http://www.adobe.com/2006/mxml&quot; layout=&quot;absolute&quot;&gt;
	&lt;mx:Script&gt;
		&lt;![CDATA[
			import mx.controls.Alert;
			import mx.collections.ArrayCollection;
			
            [Bindable]
            private var initDG:ArrayCollection = new ArrayCollection([
                {Album:&#39;Slanted and Enchanted&#39;},
                {Album:&#39;Brighten the Corners&#39;}
            ]);
            
            //inidDGの内容を表示します
            private function checkBtnHandler():void {
            	Alert.show(
            		&quot;initDGの内容確認&quot; + &quot;\n\n&quot; +
            		&quot;(0)=&quot; + Object(initDG.getItemAt(0))[&quot;Album&quot;].toString() + &quot;\n&quot; +
            		&quot;(1)=&quot; + Object(initDG.getItemAt(1))[&quot;Album&quot;].toString()
            	);
            }
 		]]&gt;
	&lt;/mx:Script&gt;
	&lt;mx:VBox&gt;
		&lt;mx:DataGrid id=&quot;dg1&quot; dataProvider=&quot;{initDG}&quot; width=&quot;300&quot; editable=&quot;true&quot;&gt;
			&lt;mx:columns&gt;
				&lt;mx:DataGridColumn headerText=&quot;Album&quot; dataField=&quot;Album&quot;&gt;
					&lt;mx:itemRenderer&gt;
						&lt;mx:Component&gt;
							&lt;mx:TextInput/&gt;
						&lt;/mx:Component&gt;
					&lt;/mx:itemRenderer&gt;
				&lt;/mx:DataGridColumn&gt;
			&lt;/mx:columns&gt;
		&lt;/mx:DataGrid&gt;
		&lt;mx:DataGrid id=&quot;dg2&quot; dataProvider=&quot;{initDG}&quot; width=&quot;300&quot; editable=&quot;true&quot;&gt;
			&lt;mx:columns&gt;
				&lt;mx:DataGridColumn headerText=&quot;Album&quot; dataField=&quot;Album&quot;&gt;
					&lt;mx:itemRenderer&gt;
						&lt;mx:Component&gt;
							&lt;mx:TextInput/&gt;
						&lt;/mx:Component&gt;
					&lt;/mx:itemRenderer&gt;
				&lt;/mx:DataGridColumn&gt;
			&lt;/mx:columns&gt;
		&lt;/mx:DataGrid&gt;
						
		&lt;mx:Button label=&quot;check!!&quot; id=&quot;checkBtn&quot; click=&quot;checkBtnHandler()&quot;/&gt;
	&lt;/mx:VBox&gt;
&lt;/mx:Application&gt;


</pre>
<p>
	&nbsp;</p>
<p>
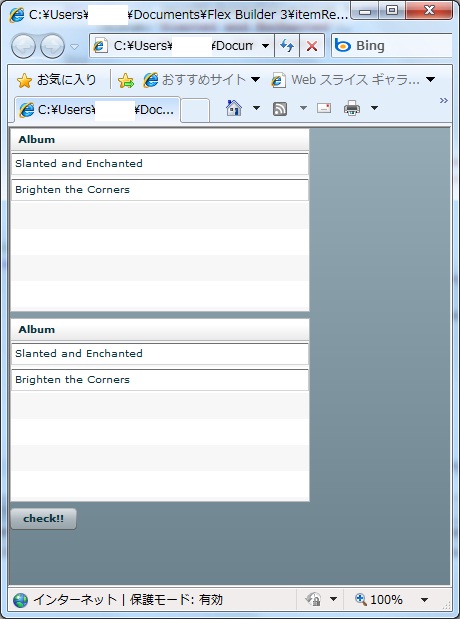
	起動直後の画面です。</p>
<p>
	<img alt="flex_itemrenderer1_06.jpg" class="mt-image-none" height="619" src="http://www.brainchild.co.jp/blog/develop/2010/09/29/flex_itemrenderer1_06.jpg" style="" width="460" /></p>
<p>
	&nbsp;</p>
<p>
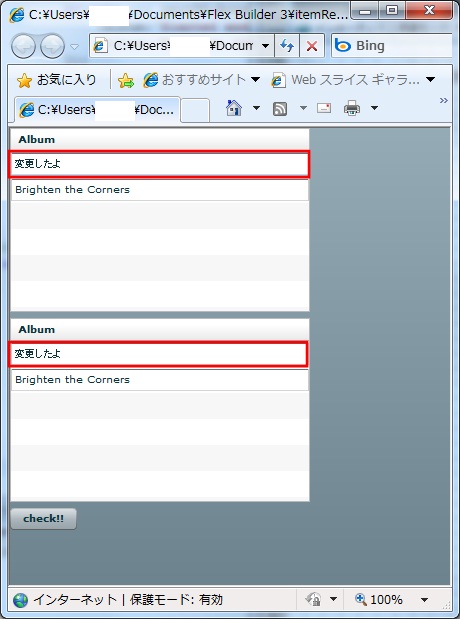
	1つ目のデータグリッドの1行目を変更します。</p>
<p>
	<img alt="flex_itemrenderer1_07.jpg" class="mt-image-none" height="619" src="http://www.brainchild.co.jp/blog/develop/2010/09/29/flex_itemrenderer1_07.jpg" style="" width="460" /></p>
<p>
	&nbsp;</p>
<p>
	2つ目のデータグリッドも変更されました。<br />
	データプロバイダの参照先を同じ変数（initDG）にしているため、このようなことが可能となります。<br />
	<br />
	応用次第では、何か面白いことが出来そうです。<br />
	<br />
	次回はアイテムレンダラーにチェックボックスを使ってみます。</p>
]]>
        
    </content>
</entry>

<entry>
    <title>[Flex]DataGridのchangeイベントを間違えない</title>
    <link rel="alternate" type="text/html" href="http://www.brainchild.co.jp/blog/develop/2010/09/dg-chgevent.html" />
    <id>tag:www.brainchild.co.jp,2010:/blog/develop//2.78</id>

    <published>2010-09-26T10:20:04Z</published>
    <updated>2011-04-24T07:05:36Z</updated>

    <summary><![CDATA[ 	&lt;mx:DataGrid&gt;のデータが変更された場合(dataPr...]]></summary>
    <author>
        <name>j.imaizumi</name>
        <uri>http://www.brainchild.co.jp/</uri>
    </author>
    
        <category term="Flex" scheme="http://www.sixapart.com/ns/types#category" />
    
        <category term="Flex 3" scheme="http://www.sixapart.com/ns/types#category" />
    
    
    <content type="html" xml:lang="ja" xml:base="http://www.brainchild.co.jp/blog/develop/">
        <![CDATA[<p>
	&lt;mx:DataGrid&gt;のデータが変更された場合(dataProviderが変更された場合）に処理を行うとします。 <br />
	その際、changeイベントをリスニングしていませんか？ <br />
	変更と言うとchangeイベントを思い浮かべる方多いようです。 <br />
	<br />
	ですが、AdobeFlexBuilderのヘルプを参照すると、changeイベントは <br />
	selectedIndex またはselectedItem プロパティの値が変更された場合に送出されるイベントと記載されています</p>
<p>
	<img alt="0926-1.jpg" class="mt-image-none" height="40" src="http://www.brainchild.co.jp/blog/develop/2010/09/26/0926-1.jpg" style="" width="745" /></p>
<p>
	実際に検証してみます。</p>
<p>
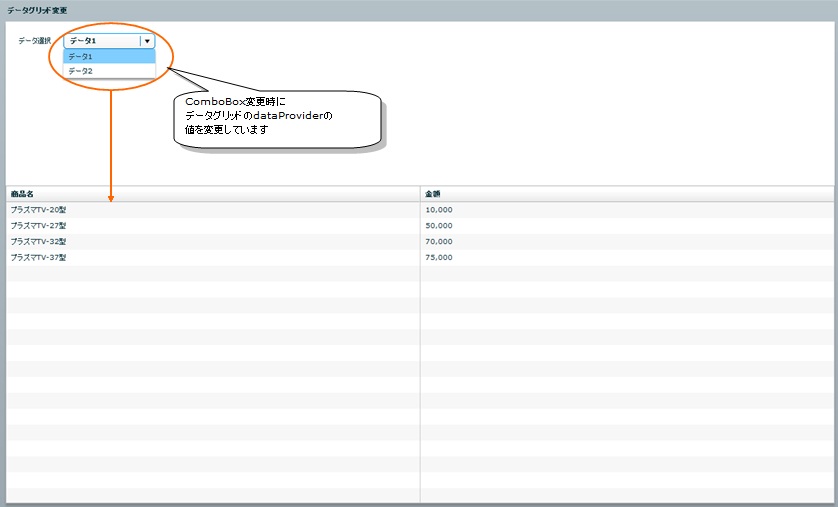
	サンプルでは、コンボボックス変更時のイベントハンドラで<br />
	　　データグリッドのdataProviderの値を変更し、<br />
	データグリッドがchangeイベントを送出した際にアラートを表示するサンプルです。</p>
<p>
	<a href="http://www.brainchild.co.jp/blog/develop/2010/09/26/0926-2.jpg"><img alt="0926-2.jpg" class="mt-image-none" height="507" src="http://www.brainchild.co.jp/blog/develop/2010/09/26/0926-2.jpg" style="" width="838" /></a></p>
<p>
	サンプルコードは以下の通り。</p>
<pre class="brush:js;">&lt;?xml version=&quot;1.0&quot; encoding=&quot;utf-8&quot;?&gt;
&lt;mx:Application creationcomplete=&quot;init(event)&quot; layout=&quot;absolute&quot; xmlns:mx=&quot;http://www.adobe.com/2006/mxml&quot;&gt;&nbsp;&nbsp;&nbsp; &lt;mx:Script&gt;
&nbsp;&nbsp;&nbsp; &nbsp;&nbsp; &nbsp;&lt;![CDATA[
&nbsp;&nbsp;&nbsp; &nbsp;&nbsp; &nbsp;&nbsp;&nbsp; &nbsp;import mx.controls.Alert;
&nbsp;&nbsp;&nbsp; &nbsp;&nbsp; &nbsp;&nbsp;&nbsp; &nbsp;import mx.collections.ArrayCollection;
&nbsp;&nbsp;&nbsp; &nbsp;&nbsp; &nbsp;&nbsp;&nbsp; &nbsp;
&nbsp;&nbsp;&nbsp; &nbsp;&nbsp; &nbsp;&nbsp;&nbsp; &nbsp;protected function init(event:Event):void
&nbsp;&nbsp;&nbsp; &nbsp;&nbsp; &nbsp;&nbsp;&nbsp; &nbsp;{
&nbsp;&nbsp;&nbsp; &nbsp;&nbsp; &nbsp;&nbsp;&nbsp; &nbsp;&nbsp;&nbsp; &nbsp;// コンボボックスのデータを設定
&nbsp;&nbsp;&nbsp; &nbsp;&nbsp; &nbsp;&nbsp;&nbsp; &nbsp;&nbsp;&nbsp; &nbsp;dataChooser.dataProvider = new ArrayCollection([&nbsp;&nbsp; &nbsp;
&nbsp;&nbsp;&nbsp; &nbsp;&nbsp; &nbsp;&nbsp;&nbsp; &nbsp;&nbsp;&nbsp; &nbsp;&nbsp;&nbsp; &nbsp;&nbsp;&nbsp; &nbsp;&nbsp;&nbsp; &nbsp;&nbsp;&nbsp; &nbsp;&nbsp;&nbsp; &nbsp;&nbsp;&nbsp; &nbsp;&nbsp;&nbsp; &nbsp;&nbsp;&nbsp; &nbsp;&nbsp;&nbsp; &nbsp;&nbsp;&nbsp; &nbsp;&nbsp;&nbsp; &nbsp;&nbsp;&nbsp; &nbsp;{data:&quot;1&quot;,label:&quot;データ1&quot;},
&nbsp;&nbsp;&nbsp; &nbsp;&nbsp; &nbsp;&nbsp;&nbsp; &nbsp;&nbsp;&nbsp; &nbsp;&nbsp;&nbsp; &nbsp;&nbsp;&nbsp; &nbsp;&nbsp;&nbsp; &nbsp;&nbsp;&nbsp; &nbsp;&nbsp;&nbsp; &nbsp;&nbsp;&nbsp; &nbsp;&nbsp;&nbsp; &nbsp;&nbsp;&nbsp; &nbsp;&nbsp;&nbsp; &nbsp;&nbsp;&nbsp; &nbsp;&nbsp;&nbsp; &nbsp;&nbsp;&nbsp; &nbsp;{data:&quot;2&quot;,label:&quot;データ2&quot;}
&nbsp;&nbsp;&nbsp; &nbsp;&nbsp; &nbsp;&nbsp;&nbsp; &nbsp;&nbsp;&nbsp; &nbsp;&nbsp;&nbsp; &nbsp;&nbsp;&nbsp; &nbsp;&nbsp;&nbsp; &nbsp;&nbsp;&nbsp; &nbsp;&nbsp;&nbsp; &nbsp;&nbsp;&nbsp; &nbsp;&nbsp;&nbsp; &nbsp;&nbsp;&nbsp; &nbsp;&nbsp;&nbsp; &nbsp;&nbsp;&nbsp; &nbsp;&nbsp;&nbsp; &nbsp;&nbsp;&nbsp; &nbsp;]);
&nbsp;&nbsp;&nbsp; &nbsp;&nbsp; &nbsp;&nbsp;&nbsp; &nbsp;}
&nbsp;&nbsp;&nbsp; &nbsp;&nbsp; &nbsp;&nbsp;&nbsp; &nbsp;
&nbsp;&nbsp;&nbsp; &nbsp;&nbsp; &nbsp;&nbsp;&nbsp; &nbsp;protected function combo_changeHandler(event:Event):void
&nbsp;&nbsp;&nbsp; &nbsp;&nbsp; &nbsp;&nbsp;&nbsp; &nbsp;{
&nbsp;&nbsp;&nbsp; &nbsp;&nbsp; &nbsp;&nbsp;&nbsp; &nbsp;&nbsp;&nbsp; &nbsp;// コンボボックスの選択状態によってデータグリッドの値を変更
&nbsp;&nbsp;&nbsp; &nbsp;&nbsp; &nbsp;&nbsp;&nbsp; &nbsp;&nbsp;&nbsp; &nbsp;switch(dataChooser.selectedIndex)
&nbsp;&nbsp;&nbsp; &nbsp;&nbsp; &nbsp;&nbsp;&nbsp; &nbsp;&nbsp;&nbsp; &nbsp;{
&nbsp;&nbsp;&nbsp; &nbsp;&nbsp; &nbsp;&nbsp;&nbsp; &nbsp;&nbsp;&nbsp; &nbsp;&nbsp;&nbsp; &nbsp;case 0:
&nbsp;&nbsp;&nbsp; &nbsp;&nbsp; &nbsp;&nbsp;&nbsp; &nbsp;&nbsp;&nbsp; &nbsp;&nbsp;&nbsp; &nbsp;{
&nbsp;&nbsp;&nbsp; &nbsp;&nbsp; &nbsp;&nbsp;&nbsp; &nbsp;&nbsp;&nbsp; &nbsp;&nbsp;&nbsp; &nbsp;&nbsp;&nbsp; &nbsp;resultDg.dataProvider = new ArrayCollection([
&nbsp;&nbsp;&nbsp; &nbsp;&nbsp; &nbsp;&nbsp;&nbsp; &nbsp;&nbsp;&nbsp; &nbsp;&nbsp;&nbsp; &nbsp;&nbsp;&nbsp; &nbsp;&nbsp;&nbsp; &nbsp;&nbsp;&nbsp; &nbsp;&nbsp;&nbsp; &nbsp;&nbsp;&nbsp; &nbsp;&nbsp;&nbsp; &nbsp;&nbsp;&nbsp; &nbsp;&nbsp;&nbsp; &nbsp;&nbsp;&nbsp; &nbsp;&nbsp;&nbsp; &nbsp;&nbsp;&nbsp; &nbsp;&nbsp;&nbsp; &nbsp;{name:&quot;プラズマTV-20型&quot;,price:&quot;10,000&quot;},
&nbsp;&nbsp;&nbsp; &nbsp;&nbsp; &nbsp;&nbsp;&nbsp; &nbsp;&nbsp;&nbsp; &nbsp;&nbsp;&nbsp; &nbsp;&nbsp;&nbsp; &nbsp;&nbsp;&nbsp; &nbsp;&nbsp;&nbsp; &nbsp;&nbsp;&nbsp; &nbsp;&nbsp;&nbsp; &nbsp;&nbsp;&nbsp; &nbsp;&nbsp;&nbsp; &nbsp;&nbsp;&nbsp; &nbsp;&nbsp;&nbsp; &nbsp;&nbsp;&nbsp; &nbsp;&nbsp;&nbsp; &nbsp;&nbsp;&nbsp; &nbsp;{name:&quot;プラズマTV-27型&quot;,price:&quot;50,000&quot;},
&nbsp;&nbsp;&nbsp; &nbsp;&nbsp; &nbsp;&nbsp;&nbsp; &nbsp;&nbsp;&nbsp; &nbsp;&nbsp;&nbsp; &nbsp;&nbsp;&nbsp; &nbsp;&nbsp;&nbsp; &nbsp;&nbsp;&nbsp; &nbsp;&nbsp;&nbsp; &nbsp;&nbsp;&nbsp; &nbsp;&nbsp;&nbsp; &nbsp;&nbsp;&nbsp; &nbsp;&nbsp;&nbsp; &nbsp;&nbsp;&nbsp; &nbsp;&nbsp;&nbsp; &nbsp;&nbsp;&nbsp; &nbsp;&nbsp;&nbsp; &nbsp;{name:&quot;プラズマTV-32型&quot;,price:&quot;70,000&quot;},
&nbsp;&nbsp;&nbsp; &nbsp;&nbsp; &nbsp;&nbsp;&nbsp; &nbsp;&nbsp;&nbsp; &nbsp;&nbsp;&nbsp; &nbsp;&nbsp;&nbsp; &nbsp;&nbsp;&nbsp; &nbsp;&nbsp;&nbsp; &nbsp;&nbsp;&nbsp; &nbsp;&nbsp;&nbsp; &nbsp;&nbsp;&nbsp; &nbsp;&nbsp;&nbsp; &nbsp;&nbsp;&nbsp; &nbsp;&nbsp;&nbsp; &nbsp;&nbsp;&nbsp; &nbsp;&nbsp;&nbsp; &nbsp;&nbsp;&nbsp; &nbsp;{name:&quot;プラズマTV-37型&quot;,price:&quot;75,000&quot;}
&nbsp;&nbsp;&nbsp; &nbsp;&nbsp; &nbsp;&nbsp;&nbsp; &nbsp;&nbsp;&nbsp; &nbsp;&nbsp;&nbsp; &nbsp;&nbsp;&nbsp; &nbsp;&nbsp;&nbsp; &nbsp;&nbsp;&nbsp; &nbsp;&nbsp;&nbsp; &nbsp;&nbsp;&nbsp; &nbsp;&nbsp;&nbsp; &nbsp;&nbsp;&nbsp; &nbsp;&nbsp;&nbsp; &nbsp;&nbsp;&nbsp; &nbsp;&nbsp;&nbsp; &nbsp;&nbsp;&nbsp; &nbsp;&nbsp;&nbsp; &nbsp;]);
&nbsp;&nbsp;&nbsp; &nbsp;&nbsp; &nbsp;&nbsp;&nbsp; &nbsp;&nbsp;&nbsp; &nbsp;&nbsp;&nbsp; &nbsp;&nbsp;&nbsp; &nbsp;break;
&nbsp;&nbsp;&nbsp; &nbsp;&nbsp; &nbsp;&nbsp;&nbsp; &nbsp;&nbsp;&nbsp; &nbsp;&nbsp;&nbsp; &nbsp;}
&nbsp;&nbsp;&nbsp; &nbsp;&nbsp; &nbsp;&nbsp;&nbsp; &nbsp;&nbsp;&nbsp; &nbsp;&nbsp;&nbsp; &nbsp;case 1:
&nbsp;&nbsp;&nbsp; &nbsp;&nbsp; &nbsp;&nbsp;&nbsp; &nbsp;&nbsp;&nbsp; &nbsp;&nbsp;&nbsp; &nbsp;{
&nbsp;&nbsp;&nbsp; &nbsp;&nbsp; &nbsp;&nbsp;&nbsp; &nbsp;&nbsp;&nbsp; &nbsp;&nbsp;&nbsp; &nbsp;&nbsp;&nbsp; &nbsp;resultDg.dataProvider = new ArrayCollection([
&nbsp;&nbsp;&nbsp; &nbsp;&nbsp; &nbsp;&nbsp;&nbsp; &nbsp;&nbsp;&nbsp; &nbsp;&nbsp;&nbsp; &nbsp;&nbsp;&nbsp; &nbsp;&nbsp;&nbsp; &nbsp;&nbsp;&nbsp; &nbsp;&nbsp;&nbsp; &nbsp;&nbsp;&nbsp; &nbsp;&nbsp;&nbsp; &nbsp;&nbsp;&nbsp; &nbsp;&nbsp;&nbsp; &nbsp;&nbsp;&nbsp; &nbsp;&nbsp;&nbsp; &nbsp;&nbsp;&nbsp; &nbsp;&nbsp;&nbsp; &nbsp;{name:&quot;ミニ掃除機&quot;,price:&quot;8,000&quot;},
&nbsp;&nbsp;&nbsp; &nbsp;&nbsp; &nbsp;&nbsp;&nbsp; &nbsp;&nbsp;&nbsp; &nbsp;&nbsp;&nbsp; &nbsp;&nbsp;&nbsp; &nbsp;&nbsp;&nbsp; &nbsp;&nbsp;&nbsp; &nbsp;&nbsp;&nbsp; &nbsp;&nbsp;&nbsp; &nbsp;&nbsp;&nbsp; &nbsp;&nbsp;&nbsp; &nbsp;&nbsp;&nbsp; &nbsp;&nbsp;&nbsp; &nbsp;&nbsp;&nbsp; &nbsp;&nbsp;&nbsp; &nbsp;&nbsp;&nbsp; &nbsp;{name:&quot;サイクロン式掃除機&quot;,price:&quot;56,800&quot;},
&nbsp;&nbsp;&nbsp; &nbsp;&nbsp; &nbsp;&nbsp;&nbsp; &nbsp;&nbsp;&nbsp; &nbsp;&nbsp;&nbsp; &nbsp;&nbsp;&nbsp; &nbsp;&nbsp;&nbsp; &nbsp;&nbsp;&nbsp; &nbsp;&nbsp;&nbsp; &nbsp;&nbsp;&nbsp; &nbsp;&nbsp;&nbsp; &nbsp;&nbsp;&nbsp; &nbsp;&nbsp;&nbsp; &nbsp;&nbsp;&nbsp; &nbsp;&nbsp;&nbsp; &nbsp;&nbsp;&nbsp; &nbsp;&nbsp;&nbsp; &nbsp;{name:&quot;スーパーサイクロン式掃除機&quot;,price:&quot;98,000&quot;},
&nbsp;&nbsp;&nbsp; &nbsp;&nbsp; &nbsp;&nbsp;&nbsp; &nbsp;&nbsp;&nbsp; &nbsp;&nbsp;&nbsp; &nbsp;&nbsp;&nbsp; &nbsp;&nbsp;&nbsp; &nbsp;&nbsp;&nbsp; &nbsp;&nbsp;&nbsp; &nbsp;&nbsp;&nbsp; &nbsp;&nbsp;&nbsp; &nbsp;&nbsp;&nbsp; &nbsp;&nbsp;&nbsp; &nbsp;&nbsp;&nbsp; &nbsp;&nbsp;&nbsp; &nbsp;&nbsp;&nbsp; &nbsp;&nbsp;&nbsp; &nbsp;{name:&quot;ロケット式掃除機&quot;,price:&quot;888,000&quot;}
&nbsp;&nbsp;&nbsp; &nbsp;&nbsp; &nbsp;&nbsp;&nbsp; &nbsp;&nbsp;&nbsp; &nbsp;&nbsp;&nbsp; &nbsp;&nbsp;&nbsp; &nbsp;&nbsp;&nbsp; &nbsp;&nbsp;&nbsp; &nbsp;&nbsp;&nbsp; &nbsp;&nbsp;&nbsp; &nbsp;&nbsp;&nbsp; &nbsp;&nbsp;&nbsp; &nbsp;&nbsp;&nbsp; &nbsp;&nbsp;&nbsp; &nbsp;&nbsp;&nbsp; &nbsp;&nbsp;&nbsp; &nbsp;&nbsp;&nbsp; &nbsp;]);
&nbsp;&nbsp;&nbsp; &nbsp;&nbsp; &nbsp;&nbsp;&nbsp; &nbsp;&nbsp;&nbsp; &nbsp;&nbsp;&nbsp; &nbsp;&nbsp;&nbsp; &nbsp;break;
&nbsp;&nbsp;&nbsp; &nbsp;&nbsp; &nbsp;&nbsp;&nbsp; &nbsp;&nbsp;&nbsp; &nbsp;&nbsp;&nbsp; &nbsp;}
&nbsp;&nbsp;&nbsp; &nbsp;&nbsp; &nbsp;&nbsp;&nbsp; &nbsp;&nbsp;&nbsp; &nbsp;&nbsp;&nbsp; &nbsp;default:
&nbsp;&nbsp;&nbsp; &nbsp;&nbsp; &nbsp;&nbsp;&nbsp; &nbsp;&nbsp;&nbsp; &nbsp;&nbsp;&nbsp; &nbsp;{
&nbsp;&nbsp;&nbsp; &nbsp;&nbsp; &nbsp;&nbsp;&nbsp; &nbsp;&nbsp;&nbsp; &nbsp;&nbsp;&nbsp; &nbsp;&nbsp;&nbsp; &nbsp;resultDg.dataProvider = null;
&nbsp;&nbsp;&nbsp; &nbsp;&nbsp; &nbsp;&nbsp;&nbsp; &nbsp;&nbsp;&nbsp; &nbsp;&nbsp;&nbsp; &nbsp;&nbsp;&nbsp; &nbsp;break;
&nbsp;&nbsp;&nbsp; &nbsp;&nbsp; &nbsp;&nbsp;&nbsp; &nbsp;&nbsp;&nbsp; &nbsp;&nbsp;&nbsp; &nbsp;}
&nbsp;&nbsp;&nbsp; &nbsp;&nbsp; &nbsp;&nbsp;&nbsp; &nbsp;&nbsp;&nbsp; &nbsp;}
&nbsp;&nbsp;&nbsp; &nbsp;&nbsp; &nbsp;&nbsp;&nbsp; &nbsp;}
&nbsp;&nbsp;&nbsp; &nbsp;&nbsp; &nbsp;&nbsp;&nbsp; &nbsp;
&nbsp;&nbsp;&nbsp; &nbsp;&nbsp; &nbsp;&nbsp;&nbsp; &nbsp;protected function datagrid_changeHandler(event:Event):void
&nbsp;&nbsp;&nbsp; &nbsp;&nbsp; &nbsp;&nbsp;&nbsp; &nbsp;{
&nbsp;&nbsp;&nbsp; &nbsp;&nbsp; &nbsp;&nbsp;&nbsp; &nbsp;&nbsp;&nbsp; &nbsp;Alert.show(&quot;データグリッドchangeイベント&quot;,&quot;DataGrid&quot;);
&nbsp;&nbsp;&nbsp; &nbsp;&nbsp; &nbsp;&nbsp;&nbsp; &nbsp;}
&nbsp;&nbsp;&nbsp; &nbsp;&nbsp; &nbsp;&nbsp;&nbsp; &nbsp;
&nbsp;&nbsp;&nbsp; &nbsp;&nbsp; &nbsp;]]&gt;
&nbsp;&nbsp;&nbsp; &lt;/mx:Script&gt;


&nbsp;&nbsp;&nbsp; &lt;mx:Panel x=&quot;0&quot; y=&quot;0&quot; width=&quot;100%&quot; height=&quot;100%&quot; layout=&quot;absolute&quot; title=&quot;データグリッド変更&quot;&gt;
&nbsp;&nbsp;&nbsp; &nbsp;&nbsp; &nbsp;&lt;mx:VBox x=&quot;0&quot; y=&quot;0&quot; width=&quot;100%&quot; height=&quot;100%&quot;&gt;
&nbsp;&nbsp;&nbsp; &nbsp;&nbsp; &nbsp;&nbsp;&nbsp; &nbsp;&lt;mx:Form width=&quot;100%&quot; height=&quot;50%&quot;&gt;
&nbsp;&nbsp;&nbsp; &nbsp;&nbsp; &nbsp;&nbsp;&nbsp; &nbsp;&nbsp;&nbsp; &nbsp;&lt;mx:FormItem label=&quot;データ選択&quot;&gt;
&nbsp;&nbsp;&nbsp; &nbsp;&nbsp; &nbsp;&nbsp;&nbsp; &nbsp;&nbsp;&nbsp; &nbsp;&nbsp;&nbsp; &nbsp;&lt;mx:ComboBox id=&quot;dataChooser&quot; change=&quot;combo_changeHandler(event)&quot; prompt=&quot;▼選択してください&quot;/&gt;
&nbsp;&nbsp;&nbsp; &nbsp;&nbsp; &nbsp;&nbsp;&nbsp; &nbsp;&nbsp;&nbsp; &nbsp;&lt;/mx:FormItem&gt;
&nbsp;&nbsp;&nbsp; &nbsp;&nbsp; &nbsp;&nbsp;&nbsp; &nbsp;&lt;/mx:Form&gt;
&nbsp;&nbsp;&nbsp; &nbsp;&nbsp; &nbsp;&nbsp;&nbsp; &nbsp;&lt;mx:DataGrid width=&quot;100%&quot; height=&quot;100%&quot; id=&quot;resultDg&quot; change=&quot;datagrid_changeHandler(event)&quot;&gt;
&nbsp;&nbsp;&nbsp; &nbsp;&nbsp; &nbsp;&nbsp;&nbsp; &nbsp;&nbsp;&nbsp; &nbsp;&lt;mx:columns&gt;
&nbsp;&nbsp;&nbsp; &nbsp;&nbsp; &nbsp;&nbsp;&nbsp; &nbsp;&nbsp;&nbsp; &nbsp;&nbsp;&nbsp; &nbsp;&lt;mx:DataGridColumn headerText=&quot;商品名&quot; dataField=&quot;name&quot;/&gt;
&nbsp;&nbsp;&nbsp; &nbsp;&nbsp; &nbsp;&nbsp;&nbsp; &nbsp;&nbsp;&nbsp; &nbsp;&nbsp;&nbsp; &nbsp;&lt;mx:DataGridColumn headerText=&quot;金額&quot; dataField=&quot;price&quot;/&gt;
&nbsp;&nbsp;&nbsp; &nbsp;&nbsp; &nbsp;&nbsp;&nbsp; &nbsp;&nbsp;&nbsp; &nbsp;&lt;/mx:columns&gt;
&nbsp;&nbsp;&nbsp; &nbsp;&nbsp; &nbsp;&nbsp;&nbsp; &nbsp;&lt;/mx:DataGrid&gt;
&nbsp;&nbsp;&nbsp; &nbsp;&nbsp; &nbsp;&lt;/mx:VBox&gt;
&nbsp;&nbsp;&nbsp; &lt;/mx:Panel&gt;
&lt;/mx:Application&gt;

</pre>
<p>
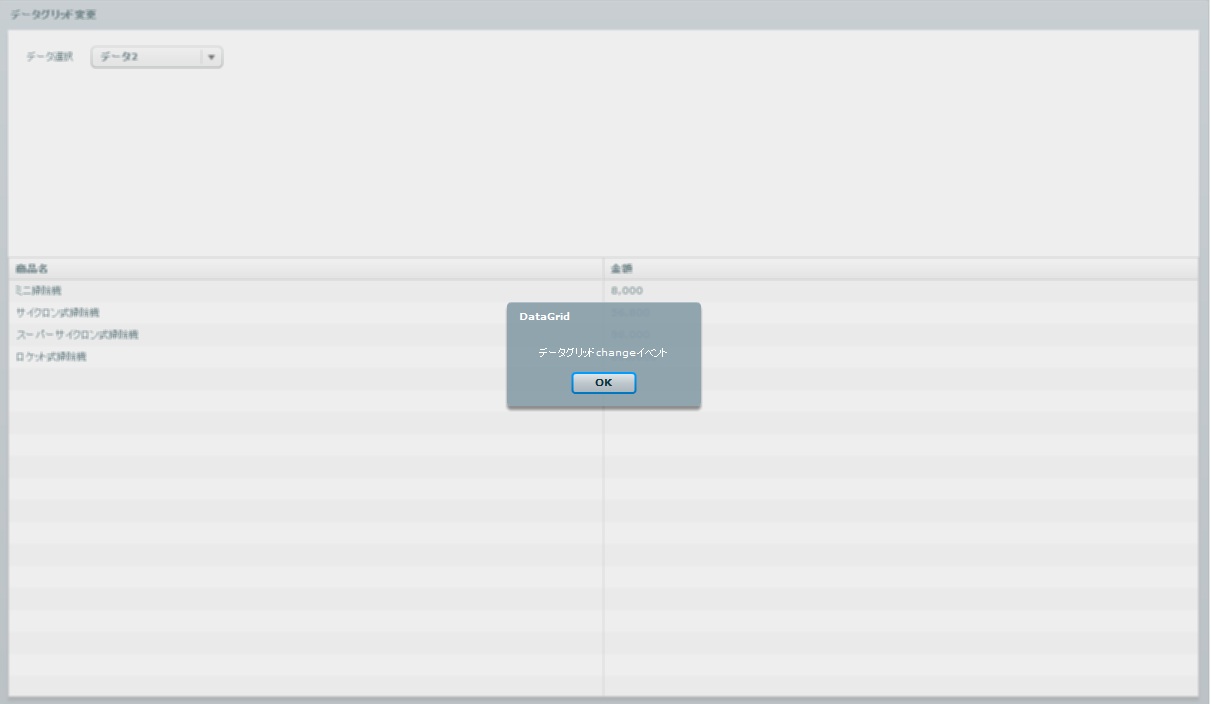
	サンプルを実行し、コンボボックスの値を変更した際<br />
	DataGridのchangeイベントハンドラで実装したアラートは表示されません。</p>
<p>
	データグリッドの値が変更されたタイミングで処理を実行したい場合、changeイベントではなく<br />
	valueCommitを指定する必要があります。</p>
<p>
	<img alt="0926-3.jpg" class="mt-image-none" height="28" src="http://www.brainchild.co.jp/blog/develop/2010/09/26/0926-3.jpg" style="" width="779" /></p>
<pre class="brush:js;">&lt;mx:DataGrid width=&quot;100%&quot; height=&quot;100%&quot; id=&quot;resultDg&quot; <span style="color: rgb(0, 255, 0);"><strong>valueCommit</strong></span>=&quot;datagrid_changeHandler(event)&quot;&gt;

</pre>
<p>
	&lt;実行結果&gt;</p>
<p>
	<img alt="0926-4.jpg" class="mt-image-none" height="704" src="http://www.brainchild.co.jp/blog/develop/2010/09/26/0926-4.jpg" style="" width="1211" /></p>
<p>
	普通にテストを行っていれば、UTで発見できるとは思いますが、<br />
	うっかりテストで気が付けな買った場合、コード上は問題ないように見えてしまうので注意が必要です</p>
]]>
        <![CDATA[<p>
	<br />
<script id="cke_actscrpt" type="text/javascript">window.onload = function(){window.parent.CKEDITOR._["contentDomReadyeditor-content-textarea"]( window );}</script></p>]]>
    </content>
</entry>

<entry>
    <title>[Ruby] eclipseでRuby開発を行ってみる</title>
    <link rel="alternate" type="text/html" href="http://www.brainchild.co.jp/blog/develop/2010/09/ruby-eclipse2.html" />
    <id>tag:www.brainchild.co.jp,2010:/blog/develop//2.72</id>

    <published>2010-09-22T17:07:26Z</published>
    <updated>2010-09-22T17:21:01Z</updated>

    <summary> 	前回までで、Ruby開発環境（RadRails）を構築しました。 	 	　【...</summary>
    <author>
        <name>suke</name>
        <uri>http://www.brainchild.co.jp/</uri>
    </author>
    
        <category term="Ruby" scheme="http://www.sixapart.com/ns/types#category" />
    
        <category term="開発環境構築" scheme="http://www.sixapart.com/ns/types#category" />
    
    
    <content type="html" xml:lang="ja" xml:base="http://www.brainchild.co.jp/blog/develop/">
        <![CDATA[<p>
	前回までで、Ruby開発環境（RadRails）を構築しました。<br />
	<br />
	　【前回までの記事】<br />
	　第1回：<a href="http://www.brainchild.co.jp/blog/develop/2010/09/ruby-download.html">Rubyのダウンロード</a><br />
	　第2回：<a href="http://www.brainchild.co.jp/blog/develop/2010/09/ruby-install.html">Rubyのインストール</a><br />
	　第3回：<a href="http://www.brainchild.co.jp/blog/develop/2010/09/ruby-eclipse.html">eclipseにRuby開発環境（RadRails）を構築する</a><br />
	<br />
	今回は、動作確認も兼ねて実際にeclipseでRubyスクリプトを作成します。<br />
	定番の「Hello World」を表示してみましょう！</p>
<p>
	&nbsp;</p>
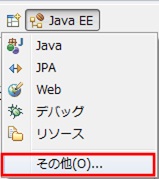
<h4>
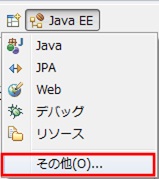
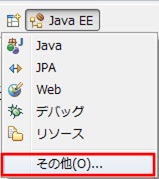
	１．Eclipseのパースペクティブから「その他」をクリックします。</h4>
<p>
	<img alt="Ruby-04-01.jpg" class="mt-image-none" height="179" src="http://www.brainchild.co.jp/blog/develop/2010/09/23/Ruby-04-01.jpg" style="" width="159" /></p>
<p>
	&nbsp;</p>
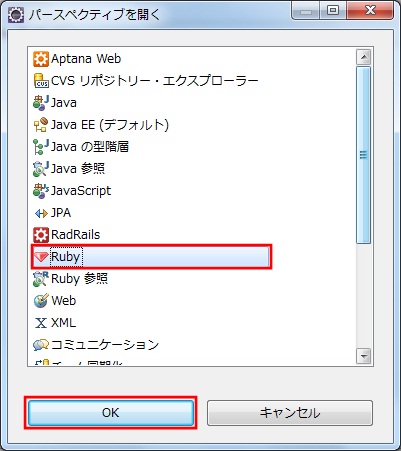
<h4>
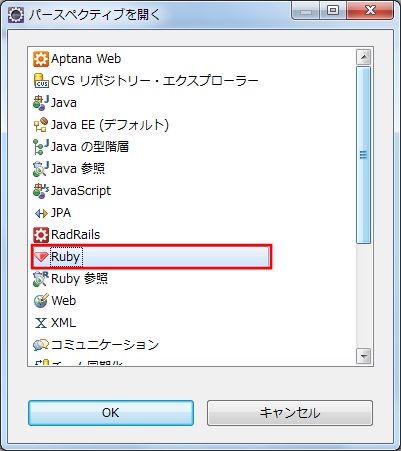
	２．「Ruby」を選択して「OK」ボタンをクリックします。</h4>
<p>
	<img alt="Ruby-04-02.jpg" class="mt-image-none" height="451" src="http://www.brainchild.co.jp/blog/develop/2010/09/23/Ruby-04-02.jpg" style="" width="401" /></p>
<p>
	&nbsp;</p>
<h4>
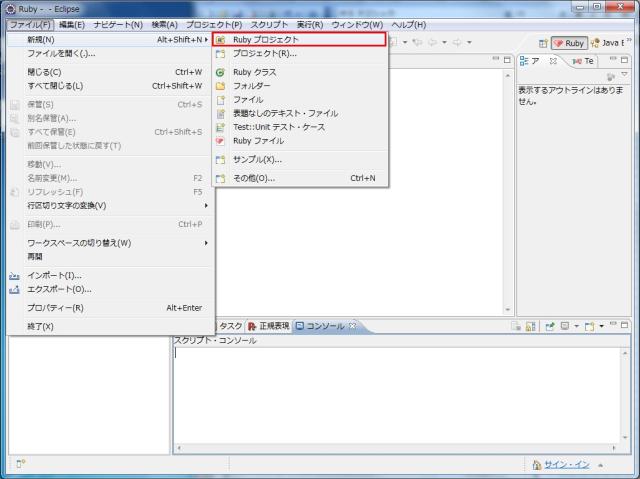
	３．Eclipeseのメニューから「ファイル&rarr;新規&rarr;Rubyプロジェクト」をクリックします。</h4>
<p>
	<a href="http://www.brainchild.co.jp/blog/develop/assets_c/2010/09/Ruby-04-03-483.html"><img alt="Ruby-04-03.jpg" class="mt-image-none" height="479" src="http://www.brainchild.co.jp/blog/develop/assets_c/2010/09/Ruby-04-03-thumb-640x479-483.jpg" style="" width="640" /></a></p>
<p>
	&nbsp;</p>
<h4>
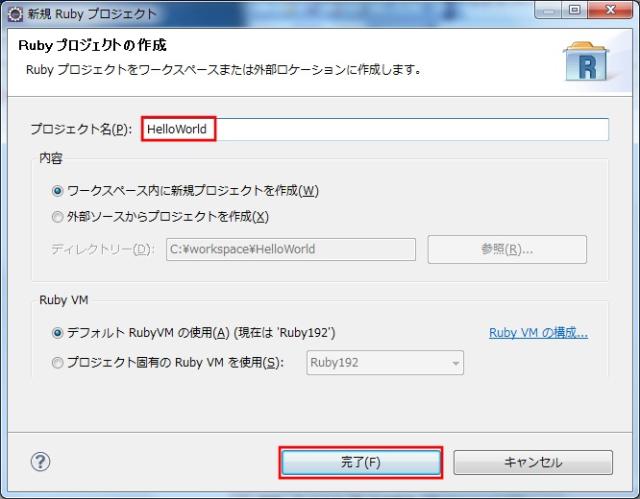
	４．任意のプロジェクト名を入力して「完了」ボタンをクリックします。</h4>
<p>
	<a href="http://www.brainchild.co.jp/blog/develop/assets_c/2010/09/Ruby-04-04-486.html"><img alt="Ruby-04-04.jpg" class="mt-image-none" height="499" src="http://www.brainchild.co.jp/blog/develop/assets_c/2010/09/Ruby-04-04-thumb-640x499-486.jpg" style="" width="640" /></a></p>
<p>
	&nbsp;</p>
<h4>
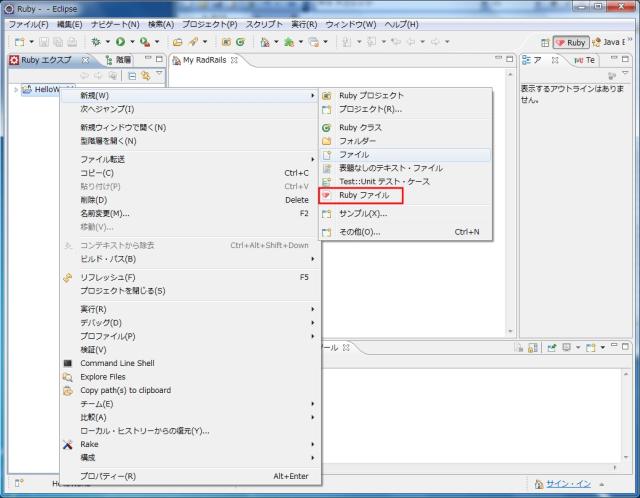
	５．作成したプロジェクトを右クリックして「新規&rarr;Rubyファイル」をクリックします。</h4>
<p>
	<a href="http://www.brainchild.co.jp/blog/develop/assets_c/2010/09/Ruby-04-05-489.html"><img alt="Ruby-04-05.jpg" class="mt-image-none" height="498" src="http://www.brainchild.co.jp/blog/develop/assets_c/2010/09/Ruby-04-05-thumb-640x498-489.jpg" style="" width="640" /></a></p>
<p>
	&nbsp;</p>
<h4>
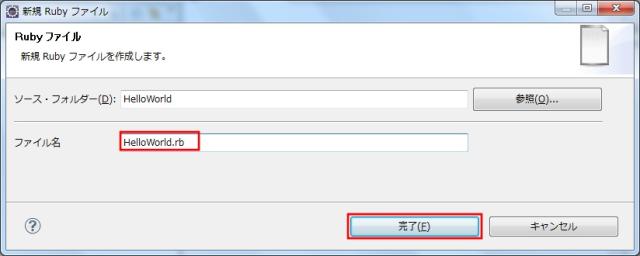
	６．任意のファイル名（拡張子「rb」）を入力して「完了」ボタンをクリックします。</h4>
<p>
	<a href="http://www.brainchild.co.jp/blog/develop/assets_c/2010/09/Ruby-04-06-492.html"><img alt="Ruby-04-06.jpg" class="mt-image-none" height="256" src="http://www.brainchild.co.jp/blog/develop/assets_c/2010/09/Ruby-04-06-thumb-640x256-492.jpg" style="" width="640" /></a></p>
<p>
	&nbsp;</p>
<h4>
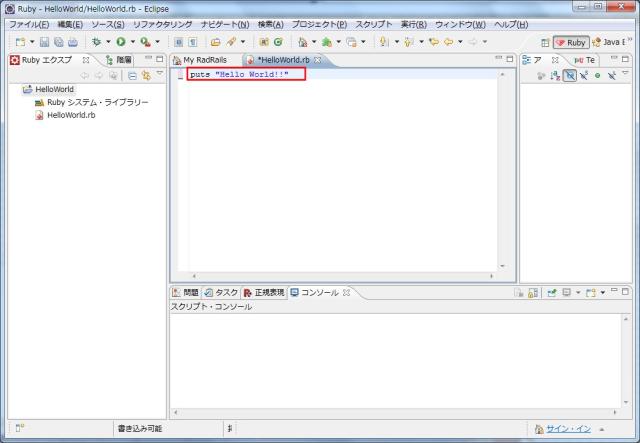
	７．作成したファイルを開いて「puts &quot;Hello World!!」を入力します。</h4>
<p>
	<a href="http://www.brainchild.co.jp/blog/develop/assets_c/2010/09/Ruby-04-07-495.html"><img alt="Ruby-04-07.jpg" class="mt-image-none" height="443" src="http://www.brainchild.co.jp/blog/develop/assets_c/2010/09/Ruby-04-07-thumb-640x443-495.jpg" style="" width="640" /></a></p>
<p>
	&nbsp;</p>
<h4>
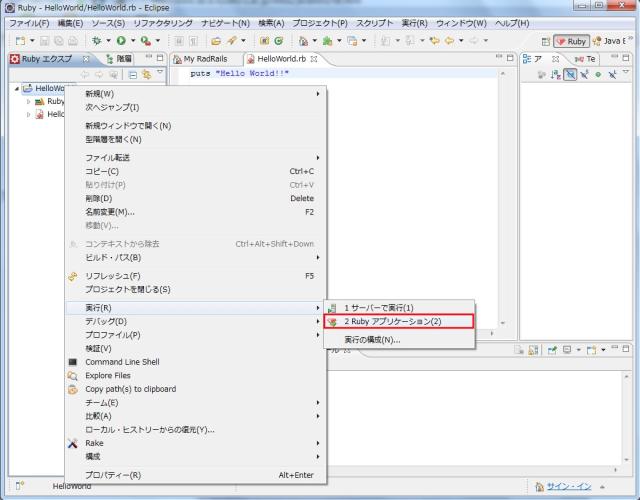
	８．ファイルを右クリックして「実行&rarr;1 Perlローカル」をクリックします。</h4>
<p>
	<a href="http://www.brainchild.co.jp/blog/develop/assets_c/2010/09/Ruby-04-08-498.html"><img alt="Ruby-04-08.jpg" class="mt-image-none" height="500" src="http://www.brainchild.co.jp/blog/develop/assets_c/2010/09/Ruby-04-08-thumb-640x500-498.jpg" style="" width="640" /></a></p>
<p>
	&nbsp;</p>
<h4>
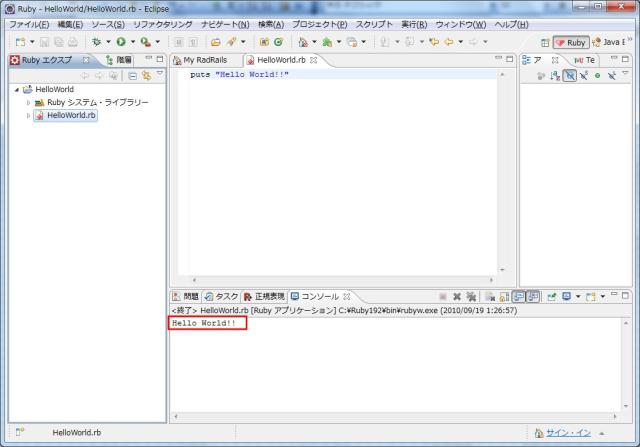
	９．コンソールビューに「Hello World!!」が表示されれば成功です。</h4>
<p>
	<a href="http://www.brainchild.co.jp/blog/develop/assets_c/2010/09/Ruby-04-09-501.html"><img alt="Ruby-04-09.jpg" class="mt-image-none" height="447" src="http://www.brainchild.co.jp/blog/develop/assets_c/2010/09/Ruby-04-09-thumb-640x447-501.jpg" style="" width="640" /></a></p>
<p>
	&nbsp;</p>
<p>
	簡単でしたが、以上でRubyプログラムの作成は終了です。</p>
]]>
        
    </content>
</entry>

<entry>
    <title>[ActivePerl] eclipseでPer開発を行ってみる</title>
    <link rel="alternate" type="text/html" href="http://www.brainchild.co.jp/blog/develop/2010/09/activeperl4.html" />
    <id>tag:www.brainchild.co.jp,2010:/blog/develop//2.71</id>

    <published>2010-09-22T16:54:28Z</published>
    <updated>2011-04-24T07:03:00Z</updated>

    <summary> 	前回までで、Perl開発環境（EPIC）を構築しました。 	 	　【前回まで...</summary>
    <author>
        <name>suke</name>
        <uri>http://www.brainchild.co.jp/</uri>
    </author>
    
        <category term="ActivePerl" scheme="http://www.sixapart.com/ns/types#category" />
    
        <category term="Perl" scheme="http://www.sixapart.com/ns/types#category" />
    
        <category term="開発環境構築" scheme="http://www.sixapart.com/ns/types#category" />
    
    
    <content type="html" xml:lang="ja" xml:base="http://www.brainchild.co.jp/blog/develop/">
        <![CDATA[<p>
	前回までで、Perl開発環境（EPIC）を構築しました。<br />
	<br />
	　【前回までの記事】<br />
	　第1回：<a href="http://www.brainchild.co.jp/blog/develop/2010/09/activeperl1.html">ActivePerlのダウンロード</a><br />
	　第2回：<a href="http://www.brainchild.co.jp/blog/develop/2010/09/activeperl2.html">ActivePerlのインストール</a><br />
	　第3回：<a href="http://www.brainchild.co.jp/blog/develop/2010/09/activeperl3.html">eclipseにPerl開発環境（EPIC）を構築する</a><br />
	<br />
	今回は、動作確認も兼ねて実際にeclipseでPerlスクリプトを作成します。<br />
	定番の「Hello World」を表示してみましょう！</p>
<p>
	&nbsp;</p>
<h4>
	１．Eclipseのパースペクティブから「その他」をクリックします。</h4>
<p>
	<img alt="ActivePerl_04_01.jpg" class="mt-image-none" height="179" src="http://www.brainchild.co.jp/blog/develop/ActivePerl_04_01.jpg" style="" width="159" /></p>
<p>
	&nbsp;</p>
<h4>
	２．「Perl」を選択して「OK」ボタンをクリックします。</h4>
<p>
	<img alt="ActivePerl_04_02.jpg" class="mt-image-none" height="451" src="http://www.brainchild.co.jp/blog/develop/2010/09/23/ActivePerl_04_02.jpg" style="" width="401" /></p>
<p>
	&nbsp;</p>
<h4>
	３．Eclipeseのメニューから「ファイル&rarr;新規&rarr;Perlプロジェクト」をクリックします。</h4>
<p>
	<a href="http://www.brainchild.co.jp/blog/develop/assets_c/2010/09/ActivePerl_04_03-464.html"><img alt="ActivePerl_04_03.jpg" class="mt-image-none" height="480" src="http://www.brainchild.co.jp/blog/develop/assets_c/2010/09/ActivePerl_04_03-thumb-640x480-464.jpg" style="" width="640" /></a></p>
<p>
	&nbsp;</p>
<h4>
	４．任意のプロジェクト名を入力して「完了」ボタンをクリックします。</h4>
<p>
	<img alt="ActivePerl_04_04.jpg" class="mt-image-none" height="373" src="http://www.brainchild.co.jp/blog/develop/2010/09/23/ActivePerl_04_04.jpg" style="" width="587" /></p>
<p>
	&nbsp;</p>
<h4>
	５．作成したプロジェクトを右クリックして「新規&rarr;Perlファイル」をクリックします。</h4>
<p>
	<a href="http://www.brainchild.co.jp/blog/develop/assets_c/2010/09/ActivePerl_04_05-468.html"><img alt="ActivePerl_04_05.jpg" class="mt-image-none" height="485" src="http://www.brainchild.co.jp/blog/develop/assets_c/2010/09/ActivePerl_04_05-thumb-640x485-468.jpg" style="" width="640" /></a></p>
<p>
	&nbsp;</p>
<h4>
	６．任意のファイル名（拡張子「pl」）を入力して「完了」ボタンをクリックします。</h4>
<p>
	<img alt="ActivePerl_04_06.jpg" class="mt-image-none" height="455" src="http://www.brainchild.co.jp/blog/develop/2010/09/23/ActivePerl_04_06.jpg" style="" width="497" /></p>
<p>
	&nbsp;</p>
<h4>
	７．作成したファイルを開いて「print &quot;Hello World!!」を入力します。</h4>
<p>
	<a href="http://www.brainchild.co.jp/blog/develop/assets_c/2010/09/ActivePerl_04_07-472.html"><img alt="ActivePerl_04_07.jpg" class="mt-image-none" height="480" src="http://www.brainchild.co.jp/blog/develop/assets_c/2010/09/ActivePerl_04_07-thumb-640x480-472.jpg" style="" width="640" /></a></p>
<p>
	&nbsp;</p>
<h4>
	８．ファイルを右クリックして「実行&rarr;1 Perlローカル」をクリックします。</h4>
<p>
	<a href="http://www.brainchild.co.jp/blog/develop/assets_c/2010/09/ActivePerl_04_08-475.html"><img alt="ActivePerl_04_08.jpg" class="mt-image-none" height="481" src="http://www.brainchild.co.jp/blog/develop/assets_c/2010/09/ActivePerl_04_08-thumb-640x481-475.jpg" style="" width="640" /></a></p>
<p>
	&nbsp;</p>
<h4>
	９．コンソールビューに「Hello World!!」が表示されれば成功です。</h4>
<p>
	<a href="http://www.brainchild.co.jp/blog/develop/assets_c/2010/09/ActivePerl_04_09-478.html"><img alt="ActivePerl_04_09.jpg" class="mt-image-none" height="480" src="http://www.brainchild.co.jp/blog/develop/assets_c/2010/09/ActivePerl_04_09-thumb-640x480-478.jpg" style="" width="640" /></a></p>
<p>
	&nbsp;</p>
<p>
	簡単でしたが、以上でPerlプログラムの作成は終了です。</p>]]>
        
    </content>
</entry>

<entry>
    <title>[Ruby]eclipseにRuby開発環境（RadRails）を構築する</title>
    <link rel="alternate" type="text/html" href="http://www.brainchild.co.jp/blog/develop/2010/09/ruby-eclipse.html" />
    <id>tag:www.brainchild.co.jp,2010:/blog/develop//2.69</id>

    <published>2010-09-20T14:05:20Z</published>
    <updated>2010-09-20T14:41:03Z</updated>

    <summary> 	前回までで、Rubyのインストールが完了しました。 	 	　【前回までの記事...</summary>
    <author>
        <name>suke</name>
        <uri>http://www.brainchild.co.jp/</uri>
    </author>
    
        <category term="Ruby" scheme="http://www.sixapart.com/ns/types#category" />
    
        <category term="開発環境構築" scheme="http://www.sixapart.com/ns/types#category" />
    
    
    <content type="html" xml:lang="ja" xml:base="http://www.brainchild.co.jp/blog/develop/">
        <![CDATA[<p>
	前回までで、Rubyのインストールが完了しました。<br />
	<br />
	　【前回までの記事】<br />
	　第1回：<a href="http://www.brainchild.co.jp/blog/develop/2010/09/ruby-download.html">Rubyのダウンロード</a><br />
	　第2回：<a href="http://www.brainchild.co.jp/blog/develop/2010/09/ruby-install.html">Rubyのインストール</a><br />
	<br />
	今回は、eclipseにRuby開発環境を構築していきます。<br />
	※eclipseは予めインストールされている必要があります。<br />
	　私の環境ではeclipse3.6（HELIOS）がインストールされています。<br />
	<br />
	そこで必要となるのがRadRailsプラグインです。<br />
	RadRailsプラグインは、Ruby と Ruby on Rails の開発環境です。<br />
	<br />
	それでは早速始めていきます。</p>
<h4>
	１．Eclipseのメニューから「ヘルプ&rarr;新規ソフトウェアのインストール」をクリックします。</h4>
<p>
	<a href="http://www.brainchild.co.jp/blog/develop/assets_c/2010/09/Ruby-03-01-427.html"><img alt="Ruby-03-01.jpg" class="mt-image-none" height="324" src="http://www.brainchild.co.jp/blog/develop/2010/09/20/Ruby-03-01.jpg" style="" width="358" /></a></p>
<p>
	&nbsp;</p>
<h4>
	２．「追加」ボタンをクリックします。</h4>
<p>
	<a href="http://www.brainchild.co.jp/blog/develop/assets_c/2010/09/Ruby-03-02-430.html"><img alt="Ruby-03-02.jpg" class="mt-image-none" height="493" src="http://www.brainchild.co.jp/blog/develop/assets_c/2010/09/Ruby-03-02-thumb-640x493-430.jpg" style="" width="640" /></a></p>
<p>
	&nbsp;</p>
<h4>
	３．下記の情報を入力して「OK」ボタンをクリックします。</h4>
<p>
	名前：任意の名前を入力します。<br />
	ロケーション：「http://download.aptana.com/tools/radrails/plugin/install/radrails-bundle」を入力します。</p>
<p>
	<a href="http://www.brainchild.co.jp/blog/develop/assets_c/2010/09/Ruby-03-03-433.html"><img alt="Ruby-03-03.jpg" class="mt-image-none" height="155" src="http://www.brainchild.co.jp/blog/develop/assets_c/2010/09/Ruby-03-03-thumb-640x155-433.jpg" style="" width="640" /></a></p>
<h4>
	&nbsp;</h4>
<h4>
	４．「Rails」を選択して「次へ」ボタンをクリックします。</h4>
<p>
	<a href="http://www.brainchild.co.jp/blog/develop/assets_c/2010/09/Ruby-03-04-436.html"><img alt="Ruby-03-04.jpg" class="mt-image-none" height="465" src="http://www.brainchild.co.jp/blog/develop/assets_c/2010/09/Ruby-03-04-thumb-640x465-436.jpg" style="" width="640" /></a></p>
<p>
	&nbsp;</p>
<h4>
	５．「次へ」ボタンをクリックします。</h4>
<p>
	<a href="http://www.brainchild.co.jp/blog/develop/assets_c/2010/09/Ruby-03-05-439.html"><img alt="Ruby-03-05.jpg" class="mt-image-none" height="465" src="http://www.brainchild.co.jp/blog/develop/assets_c/2010/09/Ruby-03-05-thumb-640x465-439.jpg" style="" width="640" /></a></p>
<p>
	&nbsp;</p>
<h4>
	６．「使用条件の条項に同意します」を選択して「完了」ボタンをクリックします。</h4>
<p>
	<a href="http://www.brainchild.co.jp/blog/develop/assets_c/2010/09/Ruby-03-06-442.html"><img alt="Ruby-03-06.jpg" class="mt-image-none" height="465" src="http://www.brainchild.co.jp/blog/develop/assets_c/2010/09/Ruby-03-06-thumb-640x465-442.jpg" style="" width="640" /></a></p>
<p>
	&nbsp;</p>
<p>
	インストールが開始します。</p>
<p>
	<a href="http://www.brainchild.co.jp/blog/develop/assets_c/2010/09/Ruby-03-07-445.html"><img alt="Ruby-03-07.jpg" class="mt-image-none" height="178" src="http://www.brainchild.co.jp/blog/develop/assets_c/2010/09/Ruby-03-07-thumb-640x178-445.jpg" style="" width="640" /></a></p>
<p>
	&nbsp;</p>
<p>
	途中で以下の警告が表示された場合は「OK」ボタンをクリックします。</p>
<p>
	<a href="http://www.brainchild.co.jp/blog/develop/assets_c/2010/09/Ruby-03-08-448.html"><img alt="Ruby-03-08.jpg" class="mt-image-none" height="116" src="http://www.brainchild.co.jp/blog/develop/assets_c/2010/09/Ruby-03-08-thumb-640x116-448.jpg" style="" width="640" /></a></p>
<p>
	&nbsp;</p>
<p>
	インストールが完了したらeclipseを再起動します。</p>
<p>
	<a href="http://www.brainchild.co.jp/blog/develop/assets_c/2010/09/Ruby-03-09-454.html"><img alt="Ruby-03-09.jpg" class="mt-image-none" height="116" src="http://www.brainchild.co.jp/blog/develop/assets_c/2010/09/Ruby-03-09-thumb-640x116-454.jpg" style="" width="640" /></a></p>
<p>
	&nbsp;</p>
<h4>
	７．インストールの確認</h4>
<p>
	eclipseのパースベクティブから「その他」をクリックします。</p>
<p>
	<a href="http://www.brainchild.co.jp/blog/develop/assets_c/2010/09/Ruby-03-10-thumb-640x720-451-452.html"><img alt="Ruby-03-10.jpg" class="mt-image-none" height="179" src="http://www.brainchild.co.jp/blog/develop/2010/09/20/Ruby-03-10.jpg" style="" width="159" /></a></p>
<p>
	&nbsp;</p>
<p>
	「Ruby」が表示されていればRadRailsプラグインのインストールは完了です。</p>
<p>
	<a href="http://www.brainchild.co.jp/blog/develop/assets_c/2010/09/Ruby-03-11-459.html"><img alt="Ruby-03-11.jpg" class="mt-image-none" height="451" src="http://www.brainchild.co.jp/blog/develop/2010/09/20/Ruby-03-11.jpg" style="" width="401" /></a></p>
<p>
	&nbsp;</p>
<p>
	以上で、Ruby開発環境（RadRails）の構築は終了です。</p>
]]>
        
    </content>
</entry>

<entry>
    <title>[Python][GAE] GAEで &quot;Hello World.&quot; その３</title>
    <link rel="alternate" type="text/html" href="http://www.brainchild.co.jp/blog/develop/2010/09/pythongae-helloworld3.html" />
    <id>tag:www.brainchild.co.jp,2010:/blog/develop//2.68</id>

    <published>2010-09-20T07:01:54Z</published>
    <updated>2011-04-24T07:07:55Z</updated>

    <summary> 	前回までの記事で、GAE用Pythonのアプリケーションをローカルで動作させ...</summary>
    <author>
        <name>yajiyaji</name>
        <uri>http://www.brainchild.co.jp/</uri>
    </author>
    
        <category term="GAE" scheme="http://www.sixapart.com/ns/types#category" />
    
        <category term="Python" scheme="http://www.sixapart.com/ns/types#category" />
    
        <category term="Python" scheme="http://www.sixapart.com/ns/types#category" />
    
    
    <content type="html" xml:lang="ja" xml:base="http://www.brainchild.co.jp/blog/develop/">
        <![CDATA[<p>
	<a href="http://www.brainchild.co.jp/blog/develop/2010/09/pythongae-helloworld2.html%20">前回までの記事</a>で、GAE用Pythonのアプリケーションをローカルで動作させるところまでを記述しました。<br />
	最終回として今回は、Google App Engineに実際にデプロイし、GAE上で動作するところまで行ってみたのでご紹介したいと思います。</p>
<p>
	&nbsp;</p>
<h3>
	Google App Engineアプリケーションの登録</h3>
<h4>
	１．Google App Engine のアプリケーション登録のために、下記URLにアクセスします</h4>
<p>
	<a href="http://appengine.google.com/" target="_blank">http://appengine.google.com/</a></p>
<p>
	<a href="http://www.brainchild.co.jp/blog/develop/assets_c/2010/09/Python_GAE_Upload1-395.html"><img alt="Python_GAE_Upload1.jpg" class="mt-image-none" height="460" src="http://www.brainchild.co.jp/blog/develop/assets_c/2010/09/Python_GAE_Upload1-thumb-640x460-395.jpg" width="640" /></a></p>
<p>
	この際、Googleアカウントが必要になります。<br />
	Googleアカウントを持っていない場合は、アカウントを作成するため、画面上の「アカウントを作成」をクリックします。<br />
	Googleアカウント作成については、下記に詳細が記されています。<br />
	<a href="http://www.google.com/support/accounts/bin/topic.py?hl=jp&amp;topic=14123">http://</a><a href="http://www.google.com/support/accounts/bin/topic.py?hl=jp&amp;topic=14123">www.google.com/support/accounts/bin/topic.py?hl=jp&amp;topic=14123</a></p>
<p>
	アカウントをお持ちの場合は、ログイン情報を入力してログインします。</p>
<h4>
	２．「Create an Application」ボタンをクリックします</h4>
<p>
	<a href="http://www.brainchild.co.jp/blog/develop/assets_c/2010/09/Python_GAE_Upload2-398.html"><img alt="Python_GAE_Upload2.jpg" class="mt-image-none" height="460" src="http://www.brainchild.co.jp/blog/develop/assets_c/2010/09/Python_GAE_Upload2-thumb-640x460-398.jpg" width="640" /></a></p>
<p>
	SMS認証の画面が表示されます。</p>
<h4>
	３．必要項目を入力して「Send」ボタンをクリックします</h4>
<p>
	<a href="http://www.brainchild.co.jp/blog/develop/assets_c/2010/09/Python_GAE_Upload3A-424.html"><img alt="Python_GAE_Upload3A.jpg" class="mt-image-none" height="460" src="http://www.brainchild.co.jp/blog/develop/assets_c/2010/09/Python_GAE_Upload3A-thumb-640x460-424.jpg" width="640" /></a></p>
<table border="1" cellpadding="1" cellspacing="1" style="width: 610px; height: 58px;">
	<tbody>
		<tr>
			<td>
				Country and Carrier:</td>
			<td>
				国と通信事業者を選択します</td>
		</tr>
		<tr>
			<td>
				Mobile Number:</td>
			<td>
				電話番号、またはメールアドレス（<strong><span style="color: rgb(255, 0, 0);">@以降は入力してはいけません</span></strong>）を入力します</td>
		</tr>
	</tbody>
</table>
<p>
	Country and Carrier は、「Japan」を選択すると下記のように日本の携帯事業者が選択できるようになります。</p>
<p>
	<img alt="Python_GAE_Upload3B.jpg" border="1" height="451" src="http://www.brainchild.co.jp/blog/develop/2010/09/20/Python_GAE_Upload3B.jpg" width="363" /></p>
<p>
	「Send」ボタンクリック後、Googleから下記内容のメールが携帯に送信されてきます。</p>
<pre>Google App Engine Code: xxxxxxx
</pre>
<p>
	※xxxxxxxの部分に数字7桁のコードがあります。</p>
<h4>
	<span style="background-color: rgb(255, 160, 122);"><br />
	GAE登録時 Mobile Number 入力時に起きた問題</span></h4>
<h5>
	Movile Number には電話番号ではなく、メールアドレス（ドメインなし）を入力したほうが良い（らしい）</h5>
<p>
	Mobile Number には電話番号を入力するかと思いきや、電話番号を入力したときに下記のように怒られました。</p>
<p>
	<a href="http://www.brainchild.co.jp/blog/develop/assets_c/2010/09/Python_GAE_Upload4-417.html"><img alt="Python_GAE_Upload4.jpg" class="mt-image-none" height="146" src="http://www.brainchild.co.jp/blog/develop/assets_c/2010/09/Python_GAE_Upload4-thumb-640x146-417.jpg" width="640" /></a></p>
<p>
	私の携帯はDocomoなのですが、Googleの下記のページにも書いてあるように DocomoとKDDIには問題があるらしいです。</p>
<p>
	アプリケーション作成のための SMS 検証</p>
<p>
	<a href="http://code.google.com/intl/ja/appengine/kb/sms.html" target="_blank">http://code.google.com/intl/ja/appengine/kb/sms.html<br />
	</a></p>
<p>
	ソフトバンクであれば、電話番号の先頭に&quot;+81&quot;を付ければ良いみたいですが、ソフトバンク携帯を持っていないためこちらは未検証です。</p>
<h4>
	４．「Enter Account Code」に ３の手順後Googleから送られてきたコードを入力して、「Send」ボタンをクリックします</h4>
<p>
	<a href="http://www.brainchild.co.jp/blog/develop/assets_c/2010/09/Python_GAE_Upload5-405.html"><img alt="Python_GAE_Upload5.jpg" class="mt-image-none" height="445" src="http://www.brainchild.co.jp/blog/develop/assets_c/2010/09/Python_GAE_Upload5-thumb-640x445-405.jpg" width="640" /></a></p>
<h4>
	５．アプリケーション作成に必要な情報を入力します</h4>
<p>
	<a href="http://www.brainchild.co.jp/blog/develop/assets_c/2010/09/Python_GAE_Upload6-408.html"><img alt="Python_GAE_Upload6.jpg" class="mt-image-none" height="445" src="http://www.brainchild.co.jp/blog/develop/assets_c/2010/09/Python_GAE_Upload6-thumb-640x445-408.jpg" width="640" /></a></p>
<table border="1" cellpadding="1" cellspacing="1" style="width: 685px; height: 69px;">
	<tbody>
		<tr>
		</tr>
		<tr>
			<td>
				Application Identifier</td>
			<td>
				アプリケーションIDを入力します<br />
				※アプリケーションIDは全世界でユニークでなければなりません<br />
				　使用可能であるかは「Check Availability」ボタンを押すことで確認できます</td>
		</tr>
		<tr>
			<td>
				Application Title:</td>
			<td>
				アプリケーションタイトルを入力します<br />
				アプリケーションタイトルは任意で大丈夫です</td>
		</tr>
	</tbody>
</table>
<p>
	&nbsp;</p>
<h4>
	６．「I accept theese terms.」チェックボックスにチェックし、［Create Application］ボタンをクリックします</h4>
<p>
	<a href="http://www.brainchild.co.jp/blog/develop/assets_c/2010/09/Python_GAE_Upload8-411.html"><img alt="Python_GAE_Upload8.jpg" class="mt-image-none" height="580" src="http://www.brainchild.co.jp/blog/develop/assets_c/2010/09/Python_GAE_Upload8-thumb-640x580-411.jpg" width="640" /></a></p>
<p>
	アプリケーション作成が成功した場合、下記の画面が表示されます。</p>
<p>
	<a href="http://www.brainchild.co.jp/blog/develop/assets_c/2010/09/Python_GAE_Upload9-414.html"><img alt="Python_GAE_Upload9.jpg" class="mt-image-none" height="460" src="http://www.brainchild.co.jp/blog/develop/assets_c/2010/09/Python_GAE_Upload9-thumb-640x460-414.jpg" width="640" /></a></p>
<p>
	&nbsp;</p>
<h3>
	アプリケーションのアップロード</h3>
<p>
	実際に作成したアプリケーションをアップロードします。<br />
	ここでアップロードするファイルは、<a href="http://www.brainchild.co.jp/blog/develop/2010/09/pythongae-helloworld2.html ">前回の記事</a>で作成した「Hello world」アプリケーションです。</p>
<h4>
	１．app.yaml&nbsp;ファイルを編集します</h4>
<p>
	application設定値を上記「Google App Engineアプリケーションの登録」の「５．アプリケーション作成に必要な情報を入力します」で設定した<strong>Application Identifier</strong>の値にします。</p>
<pre class="normal">application: gae-python
version: 1
runtime: python
api_version: 1

handlers:
- url: /.*
  script: helloworld.py
</pre>
<h4>
	２．下記コマンドを入力して、アップロードを行います</h4>
<pre class="prompt">&gt; appcfg.py update helloworld/
</pre>
<p>
	※<span style="background-color: rgb(255, 255, 0);">helloworld/</span> の部分は、実際に開発を行っている <span style="color: rgb(0, 128, 128);"><strong>appl.yaml（１の手順で編集したファイル）、helloworld.py</strong></span> が存在するフォルダー名を指定します。<br />
	　私の環境はWindowsで、eclipseのworkspace をCドライブ直下に作成していますので「<span style="color: rgb(0, 0, 205);">C:\workspace\HelloWorld\src</span>」でした。<br />
	　この場合のコマンドは <span style="color: rgb(255, 255, 255);"><span style="background-color: rgb(0, 0, 0);">appcfg.py update C:\workspace\HelloWorld\src</span></span> となりました。</p>
<p>
	コマンド実行後、コマンド プロンプト には下記のようなメッセージが出力されます。</p>
<pre class="prompt">Application: gae-python; version: 1.
Server: appengine.google.com.
****************************************************************
There is a new release of the SDK available.
-----------
Latest SDK:
api_versions: [&#39;1&#39;]
release: 1.3.7
timestamp: 1282688496

-----------
Your SDK:
api_versions: [&#39;1&#39;]
release: 1.3.6
timestamp: 1278528410

-----------
Please visit http://code.google.com/appengine for the latest SDK
****************************************************************
Scanning files on local disk.
Initiating update.
Email: &lt;Googleアカウントのメールアドレスを入力します&gt;
Password for xxx@brainchild.co.jp:&lt;Googleアカウントのパスワードを入力します&gt;
Cloning 1 application file.
Deploying new version.
Checking if new version is ready to serve.
Will check again in 1 seconds.
Checking if new version is ready to serve.
Will check again in 2 seconds.
Checking if new version is ready to serve.
Will check again in 4 seconds.
Checking if new version is ready to serve.
Will check again in 8 seconds.
Checking if new version is ready to serve.
Will check again in 16 seconds.
Checking if new version is ready to serve.
Closing update: new version is ready to start serving.
</pre>
<p>
	途中で、GoogleアカウントのユーザーID（メールアドレス）、パスワード入力を求められる（&lt;Googleアカウントのメールアドレスを入力します&gt;、&lt;Googleアカウントのパスワードを入力します&gt;となっている部分）ので入力します。<br />
	アップロードが正常に終了すると、GAEにアプリケーションが登録されます。<br />
	実際に今回の手順で、私が作成したGAEのHelloWorldアプリケーションは下記になります。<br />
	<a href="http://gae-python.appspot.com/" target="_blank">http://gae-python.appspot.com/</a></p>]]>
        
    </content>
</entry>

</feed>